

Vegetable Fermentation
ID
FST-328P
 EXPERT REVIEWED
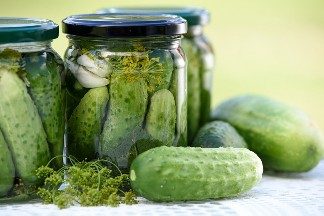
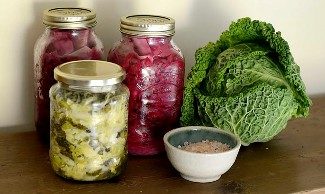
People have been fermenting vegetables for centuries to increase the stability of fresh foods, make the foods safer to eat in the absence of refrigeration, and enhance their flavor (Hutkins 2019). Today, vegetable fermentation is done on a large-scale setting in factories as well as in households across the world. In the United States, the primary vegetables fermented are cucumbers (pickles; fig. 1) and cabbage (sauerkraut and kimchi; fig. 2). In many parts of the world, especially in developing countries where refrigeration is not common, fermented foods constitute a major portion of the diet.
During vegetable fermentation, bacteria (and sometimes yeast) break down vegetable sugars into acid, carbon dioxide gas, and other flavor compounds (Hutkins 2019). The acid produced gives the vegetable tartness and keeps the food safe by preventing harmful bacteria from growing. The acid and carbon dioxide also keep spoilage microorganisms from growing, so fermented vegetables can last much longer than their fresh counterparts. Fermentation changes the flavor of vegetables and increases the nutritional content by producing B vitamins and increasing the digestibility of the vegetable by breaking down vegetable fiber.
What is fermentation?
Fermentation is a process that occurs in low- or no-oxygen conditions. Fresh vegetables naturally contain microorganisms (bacteria, yeast, and mold) that will eventually spoil them. But some of these microorganisms are key players in the fermentation process. Commonly in fresh vegetables, the spoilage organisms are higher in number and grow faster than fermenting organisms, resulting in rotting vegetables. However, salting or brining vegetables as well as controlling the atmosphere around the fermentation favors the growth of the fermenting organisms so they can overpower and outgrow the organisms that are harmful to you or spoil the food (Hutkins 2019).
The Fermenters
Of the many groups of fermenting bacteria, those from the lactic acid bacteria family (lactics) are the most important in vegetable fermentation — specifically Leuconostoc, Lactobacillus, and Pediococcus species (Hutkins 2019). These three groups of microorganisms are mainly responsible for producing the characteristic byproducts of fermented vegetables that include lactic and acetic acids, carbon dioxide, and ethanol (ethyl alcohol) from the natural vegetable sugars (Montville et. al 2012). The natural acids and other antimicrobial compounds produced by the fermenting organisms inhibit other bacteria that could be harmful to you as well as inhibit bacteria, molds, and yeasts that spoil the vegetable. The carbon dioxide produced helps maintain the low-oxygen conditions that fermenting bacteria need and stabilizes the flavor and color of the vegetables.
During most vegetable fermentations, the fermenting bacteria do not usually grow and produce compounds at the same time in the product. Instead these organisms grow in a sequential order, with each group of bacteria providing the next group of bacteria the needed environment and food to continue the fermentation. This sequential growth of fermenting microorganisms provides for acid and flavor development of the final fermented product (Hutkins 2019). The sequential growth can be broken into specific stages of fermentation: initiation, primary, and secondary fermentation. In the initiation stage, the fermentation begins with organisms that can grow easily in the vegetable and are salt-tolerant. If a fermenting culture is added, the fermenters in the culture will usually grow first in the initiation stage.
Specifically, Leuconostoc mesenteroides (in sauerkraut, kimchi, olives, and low-salted pickles) and Pediococcus cerevisiae (in high-salted pickles and olives) are important in the initiation of fermentation, since they grow much more rapidly than other bacteria due to their tolerance to a wide variety of temperatures and salt concentrations.
In the primary stage, the main fermentation occurs. This is when the fermenters that started growing in the initiation stage grow rapidly and produce acids and carbon dioxide. These acids and carbon dioxide favor the growth of more fermenting organisms and stabilize the product so that the product does not spoil. At the end of the primary stage and in the beginning of the secondary stage, the primary fermenting bacteria die as more acid is produced.
Finally, secondary fermenters that can withstand the high acid conditions take over in the secondary stage, finishing the fermentation process by adding more acid and other flavor components.
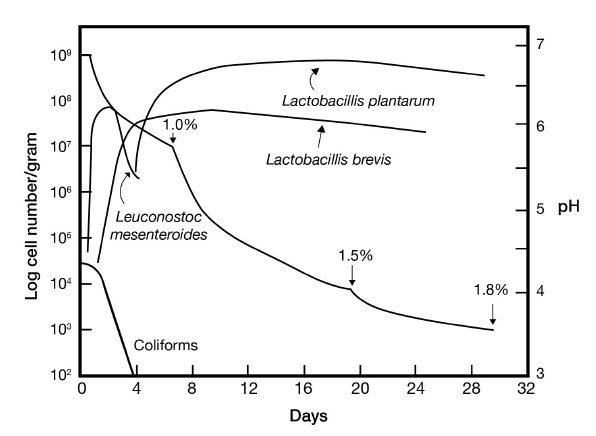
Acid-tolerant Lactobacillus brevis and Lactobacillus plantarum are responsible for the secondary fermentation of many vegetables, with Lactobacillus plantarum finishing the fermentation process as the acid accumulates in the product. Fermentation is usually stopped when acid accumulates and kills or slows the growth of the secondary fermenters. The graph (fig. 3) shows an example of sequential growth in sauerkraut where various fermenting organisms are present and growing at different stages.
During the fermentation stages, certain bacteria produce many end products when fermenting vegetable sugars. These fermentation products include natural acids such as lactic acid and acetic acid, as well as carbon dioxide, ethanol, and other flavor compounds (Hutkins 2019). Other fermenting organisms produce only acid in the fermentation process.
While only a few microorganisms have been discussed, there is recent evidence that there is a great amount of fermenting microorganisms present, especially during natural fermentation of vegetables. The more diverse and complex the fermentation population, the more byproducts are produced and the more complex tasting the product. In comparison, if only a few organisms are present and growing in the fermentation, fewer byproducts are produced and less flavor complexity results. Fermenting populations are affected by the type of organisms present at the initiation stage, salt amount, and temperature.
Unlike other food fermentations, yeast and molds are lesser microorganisms participating in vegetable fermentation and are considered sources of fermentation problems and spoilage in many cases.
Fermentation Components
There are several components that are essential for fermentation. This section will describe in detail the different components, how they are important in fermentation process and practical information on how to conduct these fermentations at home.
Culture
Starting fermentation growth can be accomplished in three basic ways:
- Spontaneous or natural – Allowing the natural fermenting microorganisms on the vegetables to grow. This technique allows for the natural sequential growth of fermenting organisms. It can be the most unpredictable method but can allow for the most developed and complex flavors because more fermenters are present.
- Back-slopping – Adding live bacteria from a fermented product to start other batches. In back- slopping, the initial fermentation stage is shortened because fermenting microorganisms are already growing and the risk of fermentation failure is lower. However, the natural sequence of fermentation is disrupted, and flavor development might not be as complex. The acidity of the back-slop can also affect the success of fermentation initiation, with the high acidity leading to poor fermentation or producing softer textured product.
- Culture inoculation – A specific bacterial culture is added to start the fermentation. Culture inoculation is done less frequently in home-based fermentations and more often in the industry to ensure consistent fermentation. Vegetables are usually heat-treated prior to inoculation to ensure only starter culture bacteria are present and growing. If a culture is used in home fermentations, be sure to follow the directions accompanying the culture. However, culture inoculation can result in a less complex flavored product, especially if the culture contains only a few fermenters.
Salt
Salt provides many functions in the fermentation process:
Allows needed water and sugars to be pulled from the vegetables that are used as nutrients by fermenting organisms.
Favors the growth of fermenting organisms over spoilage bacteria, yeast, and mold as well as harmful bacteria.
Allows for crisper vegetables by hardening the plant pectins and decreases the activity of pectinase — an enzyme that makes vegetables mushy.
Allows for longer fermentation by slowing the fermentation process and decreasing the chance of undesirable mold growth.
Gives flavor to the final product.
Salt concentration is very important in fermentation; therefore, salt amounts should be measured carefully and a tested recipe should be followed. Salt concentrations in vegetable fermentations can vary from 1% to 15% and are specific for the vegetable being fermented. Sauerkraut fermentation, for instance, occurs ideally under salt concentrations of 2.25-2.5%, while pickle fermentation is achieved in salt concentrations of 3-5% for low-salt pickles and 5-16% in high-salt pickles (Hui 2003).
In general, lower salt percentages will favor the growth of more types of fermenting organisms, especially in a natural fermentation, leading to faster acid production and a more acidic product. But lower salt concentrations can allow for mold and other contaminant growth, resulting in a softer texture or off-flavored final product. Higher salt concentrations, in general, favor growth of only certain salt-tolerant fermenting microorganisms and slow the progression of fermentation.
Salt additions are done by two basic methods:
- Direct or dry-salting – Salt is added directly to the vegetables. With this technique, it is best to allow the vegetable/salt mixture to stand so that water from the vegetables is released, forming a brine that will cover the vegetables when packed into the fermentation container. Chopping or shredding the vegetables will increase the speed of water release and allow for better fermentation initiation.
- Brining – Mixing salt and water to form brine before adding to the vegetables. This technique can allow for better coverage of the vegetables, which lessens the risk of fermentation failure. To prepare a high-quality brine it is best to use distilled or filtered water.
The quality of salt used in fermentation is essential. The salt used in fermentation should contain no additives. For example:
Anti-caking additives in table salt will cause cloudy brine.
Iodine in iodized salt can cause browning of vegetables and slow fermentation.
Impurities found in natural salts (sea salt, for example) can also affect the fermentation process.
Lime impurities can reduce the acidity and the safety of the final product. Iron impurities can blacken the vegetables.
Magnesium impurities can cause bitterness, while carbonates can result in softening, especially in pickles.
- Natural salts also vary in weight and can alter the brine solution percentage, which can affect the safety and quality of the fermentation.
Use of reduced-sodium salt in fermented pickle recipes is also not recommended. Canning or pickling salt is recommended because it contains no impurities and has a consistent granular size and weight.
Vegetables
Choose vegetables that are free from damage and disease. Damaged areas on the vegetables are susceptible to bacterial, yeast, and mold contamination and growth. Growth of these unwanted microorganisms can negatively affect the quality of the product and the fermentation process.
Certain vegetable varieties and sizes will ferment better than others. For instance, small pickling cucumbers will ferment more efficiently than larger cucumbers. Large salad cucumbers do not ferment well and do not make a good quality product.
Selection of Cucumbers
Select a variety of unwaxed cucumbers intended for pickling. Use 1½-inch cucumbers for gherkins and 4-inch cucumbers for dills (Andress and Harrison 2014). For optimum quality, pickle the cucumbers within 24 hours of harvest. Otherwise, refrigerate the cucumbers in a cool, well-ventilated location. Before fermenting, wash the cucumbers thoroughly, especially around the stem area to remove soil that contains bacteria. Remove the blossom end to prevent softening by enzymes naturally contained in the blossom.
Selection of Cabbage
King Cole, Bravo, Krautman, Sanibel, and Danish hybrids of cabbage are better for making sauerkraut as they contain larger amounts of sugar for fermenting. In general, larger heads of cabbage contain more sugar and are more suitable for fermenting. However, smaller heads of cabbage can also be used successfully. Mature heads that weigh 6 to 15 pounds and have a solid, white interior are most desirable. Use only clean cabbage, removing the outer leaves and any spoiled or damaged spots (Andress and Harrison 2014). The cabbage core should be removed because the fermented core can cause sliminess.
Selection of Spices
It is important that you follow tested and proven recipes. Many of the tested and proven recipes have spice addition options that will allow you to personalize your fermentation. Choose whole fresh or freshly dried spices. Ground and flaked, dried spices can be difficult to use since they can float to the top of the fermentation and may mold over time. Older dried spices have a higher chance of mold content when compared to fresh spices or newly dried spices (Andress and Harrison 2014).
Container Choice
Not all container materials are suitable for fermentation. Fermentation occurs in salty, acidic conditions. Metal — except for high-grade commercial stainless steel — can degrade and pit, so is usually not recommended. Ceramic crocks and plastic containers are more suitable (Andress and Harrison 2014).
Any food container chosen should be easy to clean and free from deep scratches, chips, or pits that can harbor harmful bacteria or affect the fermentation. Wooden containers have been used to ferment vegetables but can be difficult to keep clean and sanitary. Containers and other equipment should be washed in hot soapy water before using. Do not use chlorine bleach to sanitize the equipment because the remaining chlorine and chloramine residues on the equipment could inhibit the growth of fermenting organisms. If chlorine bleach is used, the equipment should be rinsed thoroughly to remove any residual chemicals.
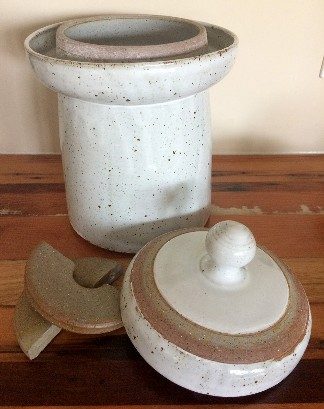
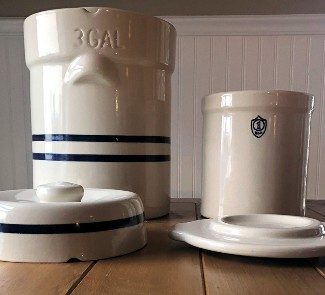
Ceramic Crocks
Ceramic crocks come in various sizes and shapes. Figures 4 and 5 provide examples of ceramic fermentation crocks. When choosing a crock, it is important to ensure that the paint or glaze does not contain lead, which is often found in crocks made before the 1970s. Lead from paint or glaze can leach into the food, most often under acidic conditions. When choosing a crock, both size and shape should be considered. For food safety and proper fermentation, it is important to have the brine/juices stay 1-2 inches above the fermented vegetables. Vegetable submersion allows for the product to stay under anaerobic conditions (without oxygen) that favors the growth of the lactic acid bacteria and other fermenting organisms. Keeping the vegetables covered allows for salt to cover the product, which also gives the lactic acid bacteria a competitive edge. It is important to choose a fermenting container that will allow for vegetables to be completely submerged under the brine fluid. In general, allow 1 gallon of crock for each 5 pounds of product.
The shape or style of crock does not affect product safety but could affect quality. Many crocks are simple cylinders with or without fitting lids. If a fitting lid does not accompany the crock, a plate or similar cover can be used. It is important to cover the product for both safety and quality. Other crocks have specialized rims with grooves or gutters in which a lid fits snuggly within. The groove or gutter must be kept constantly filled with water to provide a seal that keeps oxygen out. These specialized crocks ferment better if the lids are not removed or disrupted, which might be difficult for curious cooks.
Plastic Containers
Plastic containers can also be used successfully for fermenting vegetables. Look for high-density polyethylene containers (HDPE, No. 2 plastic) that are phthalate- and bisphenol-free. Phthalates and bisphenol are chemicals added to some plastics to increase their elasticity and flexibility. Given the acidic and salty nature of fermented products and the fact that the vegetables will be fermenting in the container for weeks, it is advisable to avoid plastics containing these compounds. Plastic containers should also be food-grade, which means they are made of plastic that can be safely used for food preparation. Other 1- to 3-gallon non-food-grade plastic containers may be used if lined inside with a clean, food-grade plastic bag. Garbage trash cans and trash bags are not considered food grade and are not suitable for fermentation (Andress and Harrison 2014).
Glass Containers
Glass containers can also be used but care should be taken to ensure they are not broken, cracked, or chipped. Half-gallon or quart canning jars can be used, but spoilage may be more of an issue because it can be more difficult to keep vegetables submerged. Use of wide-mouth jars allows for better filling and vegetable submersion. Use of plastic jar lids rather than metal lids is advisable because metal lids will degrade under acidic and salty conditions. Jar lids should be kept loose to ensure that gases produced can escape.
Other Equipment
There are other types of equipment that can also be helpful during home fermentation. These include weights, chopping and cutting tools, pounding tools and a thermometer. These items are described in detail below:
Weights
For safety and proper fermentation, it is important that the vegetables be submerged 1-2 inches below juices and brine in the fermentation container (Andress and Harrison 2014). Weighting the vegetables ensures that:
Vegetables are submerged in a salt solution.
Vegetables are covered with liquid, keeping oxygen away.
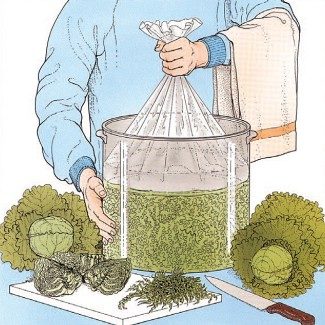
Specific weights are available in various sizes for keeping vegetables submerged. If purchasing weights, choose a size that completely fills the inside of the container and covers the vegetables as completely as possible. Weights are available in ceramic and glass materials. Examples of ceramic weights are included in figure 6. Choose weights that can be cleaned and are food-grade. Do not use weights that are not intended for food use because they may contain harmful compounds such as lead. Rocks should never be used as weights because they may contain heavy metals and limestone that can degrade under salty and acidic environments and can become part of the food.

A suitable-sized clean plate or glass pie plate can also be placed on top of the vegetables inside the fermentation most of the vegetables. The plate can be weighted down with two to three sealed quart jars filled with drinkable water or heavy-duty plastic food bags filled with a brine solution. It is recommended that the brine solution be stored in plastic bags to ensure that the fermentation brine is not diluted should the bag leak or break. The brine can be made by mixing 4 1/2 tablespoons of salt for every 3 quarts of drinkable water. Covering the fermentation container opening with a clean, heavy bath towel or lid helps prevent contamination from insects and molds while the vegetables are fermenting.

Chopping and Cutting Tools
Evenly chopped or shredded vegetables will ferment more efficiently. Chopping and cutting will help release juices from the vegetables and allow the vegetables to become more evenly brined. Knives, mandolins, and kraut boards can be used to cut vegetables. Ensure that all cutting devices can be easily cleaned and are not made container (fig. 7). The plate must be slightly smaller than the container opening, yet large enough to cover of materials that harbor microorganisms. Kraut boards and mandolins should be used with care because these devices are very sharp. Wearing metal mesh or cut-resistant gloves can add another level of safety when using these pieces of equipment beyond using the vegetable holders and safety guards provided by the utensils.
Pounding Tools

While vegetables can be allowed to rest after brining and before packing in order to allow water and juices to be naturally released from the vegetables, there are tools that can help extract the juice from vegetables more quickly. Crushers, pestles, and sauerkraut pounders crush the vegetable tissue so that the juices will be released more readily. When choosing any cooking tool, make sure that it can be easily cleaned. Cleaned and gloved hands can also be used to mix and squeeze brined vegetables to release water and juices. Shredding, chopping, and slicing will also help liberate vegetable juices.
Thermometer
Proper fermentation temperatures allow for the beneficial fermenting microorganisms to grow and prevent growth of spoilage- and disease-causing bacteria. Fermentation is best achieved at 68-72°F, although the range of 60-78°F can work. At ideal temperatures, fermentation can take three to four weeks; at lower temperatures, fermentation can take five to six weeks or longer. Generally, lower temperatures produce higher quality products.
Higher fermentation temperatures create a fast fermentation where some types of lactic acid bacteria cannot grow at all, resulting in less fermentation byproducts and a less complex flavor. If the temperature is too high, spoilage bacteria could take over and ruin the fermentation, leading to spoiled and softened vegetables. Using a thermometer to measure room and storage temperatures will allow you to monitor for proper fermentation.
Fermentation Troubleshooting
Vegetable fermentation does not require an abundance of sophisticated equipment or involve complicated procedures. However, following recipes to ensure proper salt concentration and proper fermentation temperatures, along with using proper hygiene and clean equipment, will lower the risk of fermentation failure.
Use fresh vegetables that are free from damage and spoilage. It is also important to use vegetables that have been grown using good food safety practices that include proper manure management, use of clean water, and use of proper hygiene before, during, and after vegetable harvest. These practices will lower the risk of harmful bacteria contaminating the vegetables.
Mold growth on the surface of the brine/liquid can occur. Monitoring for mold growth and scum formation on the surface and quickly removing it will ensure quality vegetable fermentation.
Occasionally, even when the recipe is followed, fermented cucumbers undergo an undesired secondary fermentation during storage, which is characterized by a decrease in acidity, the disappearance of lactic acid, and the formation of undesirable smelling propionic and butyric acids, which smell like rotting vegetables and rancid dairy products. This incidence of fermented cucumber spoilage tends to increase at the beginning of the spring season, when the temperature increases. For safety precautions, do not taste any fermentation batch that has bad or off odors; discard it.
For more help, consult table 1 on page 8 for solutions to possible problems.
Preservation After Fermentation
Once fermentation is complete, you can process the product in a boiling water canner so containers can be stored at room temperature. Canning should be done according to a tested and proven recipe. For more information on boiling water bath canning, consult Virginia Cooperative Extension publication 348-594, Boiling Water Bath Canning, Including Jams, Jellies, and Pickled Products.
You can skip the boiling water bath process and store the fermented product in the refrigerator, but product texture and flavor will suffer over time because fermenting bacteria will continue to grow, produce byproducts, and
| Problem | Cause | Prevention |
|---|---|---|
Soft or slippery pickles (If spoilage is evident, do not eat.) |
Insufficient amount of brine. Blossom ends not removed from cucumbers. Blossom end contains enzymes that soften pickles. Low salt concentration. Softening occurs because of overgrowth of spoilage microorganisms that have enzymes that soften the cucumber. Using natural salts with impurities. Carbonate impurities can cause product softening. |
Keep cucumbers immersed in the brine. Add more boiled and cooled brine if necessary. Slice at least 1/16 inch off blossom end of cucumbers and discard. Follow tested recipe that has proper salt concentration. Salt concentration for cucumber fermentation should be at least 6% for good cucumber texture. Use canning or pickling salt that has a consistent size and weight. Use canning or pickling salt. |
Soft sauerkraut (If spoilage is evident, do not eat.) |
High fermentation temperature. Above 75°F, sauerkraut may become soft. Aerobic environment where oxygen allows spoilage organisms to grow. Spoilage organisms grow due to uneven salt distribution. |
Store the fermentation container at 68-75°F while fermenting. If juice does not cover the cabbage, add boiled and cooled brine (1½ tablespoons of salt per quart of water). If using the dry-salting method, ensure salt and cabbage is mixed evenly. Allow the mixture to sit before packing it into the fermenting container. If making large batches, mix cabbage and salt in 5-lb. amounts before combining into the fermentation container. |
Shriveled pickles |
Placing cucumbers in too-strong brine. |
Follow tested recipe and use amounts of salt called for. Use canning or pickling salt that has a consistent size and weight. |
Pickles have internal air pockets (bloaters) |
Yeast buildup caused by low salt concentration. |
Follow tested recipe and use amounts of salt called for. Use canning or pickling salt that has a consistent size and weight. A recipe using added acids prior to fermentation helps reduce pickle bloating. |
Off-color sauerkraut (pink, brown, or black) |
Spoilage organisms (bacteria, yeast, and mold) growing due to aerobic environment. Brine not properly covering sauerkraut. High fermentation temperature. |
If juice does not cover the cabbage, add boiled and cooled brine (1½ tablespoons of salt per quart of water). Store the fermentation container at 70-75°F while fermenting. |
Mold growth on surface |
Mold spores on garlic or spices. Low salt concentrations. |
Use fresh spices. Follow tested recipe that has proper salt concentration. Use canning or pickling salt that has a consistent size and weight. |
Cloudy brine |
Spoilage bacteria and yeast growth. Usually accompanied by “off” or yeasty odors. Salt levels too low to prevent growth of spoilage organisms. Anti-caking agents in salt. |
Follow tested recipe that has proper salt concentration. Use canning or pickling salt. |
Strong, bitter taste |
Using salt substitutes and natural salts. Potassium chloride, the ingredient in most salt substitutes, causes bitterness. Magnesium impurities in natural salts cause bitterness. Dry weather. |
Use canning or pickling salt. No prevention. Bitter taste is usually in the peel or skin of fruits and vegetables. |
Dark or discolored pickles |
Minerals in hard water. Ground spices used. Brass, iron, copper, or zinc utensils used. Iodized salt used. |
Use whole spices. Use food-grade unchipped enamelware, glass, stainless steel, or stoneware utensils. (If brass, copper, or zinc utensils and brining equipment were used, do not use pickles.) Use canning or pickling salt. |
Spotted, dull, or faded color |
Excessive exposure to light. Poor vegetable quality. |
Use produce of optimum quality, grown under proper conditions (weather, soil, etc.). |
Mold growth on surface |
Mold spores on garlic or spices. |
Use fresh spices. |
alter the flavor and texture of the vegetables. Eventually, fermented bacteria will die due to the build-up of acid byproducts. Fermented vegetables with 1-2% salt should keep well for four to nine months, respectively, in a refrigerator. A 2% salted version should keep well in a dark, cool area, such as a root cellar, for at least three months if the vegetables are kept submerged under liquid; however, refrigerated storage is recommended.
You can successfully freeze sauerkraut. Fill pint- or quart-size bags to about 3 inches from the top of the bag. Squeeze air out of the bag to limit freezer damage, label, and freeze flat. Bags can be placed inside rigid plastic containers for extra protection from leakage. Be sure that your freezer temperature remains steady. Fluctuations (freeze, thaw, refreeze) in temperature will adversely affect the quality of the food. Pickles can also be frozen but tend to lose their texture. Some of the beneficial bacteria could die during the freezing process, but freezing will not kill all of the bacteria.
Tested Recipes
These recipes are adapted from the USDA Complete guide to Home Canning (USDA 2015, 6-7 – 6-9, Andress and Harrison 2014).
DILL PICKLES
Use the following quantities for each gallon capacity of your container.
4 pounds 4-inch pickling cucumbers
2 tablespoons dill seed or 4-5 heads fresh or dry dill weed
1/2 cup salt
1/4 cup 5% vinegar (most household vinegar is 5%)
8 cups water
Optional ingredients (use one or more):
2 cloves garlic
2 dried red peppers
2 teaspoons whole, mixed pickling spices
Wash cucumbers. Cut a 1/16-inch slice off blossom end and discard. Leave 1/4 inch of stem attached. Place half of dill and spices on the bottom of a clean, suitable container. Add cucumbers, remaining dill, and spices.
Dissolve salt in vinegar and water and pour over cucumbers. Add suitable cover and weight. Store where temperature is between 70°F and 75°F for about 3-4 weeks while fermenting. Temperatures of 55-65°F are acceptable, but the fermentation will take 5-6 weeks. Avoid temperatures above 80°F or pickles will become too soft during fermentation. Fermenting pickles cure slowly. Check the container several times a week and promptly remove surface scum or mold. Caution: If the pickles become soft, slimy, or develop a disagreeable odor, discard them.
Fully fermented pickles may be stored in the original container for about 4-6 months provided they are refrigerated and surface scum and molds are removed regularly. Canning fully fermented pickles is a better way to store them. To can them, pour the brine into a pan, heat slowly to a boil, and simmer 5 minutes. Filter brine through paper coffee filters to reduce cloudiness, if desired.
Fill hot jar with pickles and hot brine, leaving 1/2-inch headspace. Remove air bubbles and adjust headspace if needed. Wipe rims of jars with a clean, dampened paper towel. Adjust lids and process as below or use the low- temperature pasteurization treatment.
| Style of pack | Jar size | 0-1,000 feet | 1,001-6,000 feet | Above 6,000 feet |
|---|---|---|---|---|
| Raw | Pints | 10 | 15 | 20 |
| Quarts | 15 | 20 | 25 |
SAUERKRAUT
25 pounds cabbage
3/4 cup canning or pickling salt
Quality: For the best sauerkraut, use firm heads of fresh cabbage. Shred cabbage and start kraut between 24 and 48 hours after harvest.
Yield: About 9 quarts
Work with about 5 pounds of cabbage at a time. Discard outer leaves. Rinse heads under cold running water and drain. Cut heads in quarters and remove cores. Shred or slice to the thickness of a quarter.
Put cabbage in a suitable fermentation container and add 3 tablespoons of salt. Mix thoroughly, using clean hands. Pack firmly until salt draws juices from cabbage. Repeat shredding, salting, and packing until all cabbage is in the container. Be sure it is deep enough so that its rim is at least 4-5 inches above the cabbage. If juice does not cover cabbage, add boiled and cooled brine (1 1/2 tablespoons of salt per quart of water). Add plate and weights; cover container with a clean bath towel.
Store at 70-75°F while fermenting. At temperatures between 70°F and 75°F, kraut will be fully fermented in about 3-4 weeks; at 60-65°F, fermentation may take 5-6 weeks. At temperatures lower than 60°F, kraut might not ferment; above 75°F, kraut can become soft.
If you weigh the cabbage down with a brine-filled bag, do not disturb the crock until normal fermentation is completed (when bubbling ceases). If you use jars as weight, you will have to check the kraut two to three times each week and remove scum if it forms. Fully fermented kraut can be kept tightly covered in the refrigerator for several months, or it can be canned using hot pack or raw pack methods.
Hot pack – Bring kraut and liquid slowly to a boil in a large kettle, stirring frequently. Remove from heat and fill hot jars rather firmly with kraut and juices, leaving 1/2-inch headspace.
Raw pack – Fill hot jars firmly with kraut and cover with juices, leaving 1/2-inch headspace.
Remove air bubbles and adjust headspace if needed. Wipe rims of jars with a clean, dampened paper towel. Adjust lids and process.
| Style of pack | Jar Size | 0-1,000 feet | 1,001-3,000 feet | 3,001-6,000 feet | Above 6,000 feet |
|---|---|---|---|---|---|
| Hot | Pints | 10 | 15 | 15 | 20 |
| Quarts | 15 | 20 | 20 | 25 | |
| Raw | Pints | 20 | 25 | 30 | 35 |
| Quarts | 25 | 30 | 35 | 40 |
References
Andress, Elizabeth, and Judy Harrison. 2014. So Easy to Preserve, 6th ed. Bulletin 989. Athens, GA: University of Georgia Cooperative Extension.
Hutkins, Robert W. Microbiology and Technology of Fermented Foods. 2019. IFT Press. Wiley Blackwell.
Montville, Thomas J., Karl R. Matthews, and Kalmia Kniel. 2012. Food Microbiology, 3rd Edition. ASM Press, Washington. D.C.
Hui, Y. H., Sue Ghazala, Dee M. Graham, K. D. Murrell, and Wai-Kit Nip, eds. 2003. Handbook of Vegetable Preservation and Processing. Boca Raton, FL: CRC Press.
USDA (U.S. Department of Agriculture). 2015. “Preparing and Canning Fermented Foods and Pickled Vegetables.” Guide 6 of USDA Complete Guide to Home Canning. USDA National Institute of Food and Agriculture. Agriculture Information Bulletin No. 539. https://nchfp.uga.edu/publications/ usda/GUIDE06_HomeCan_rev0715.pdf.
Virginia Cooperative Extension materials are available for public use, reprint, or citation without further permission, provided the use includes credit to the author and to Virginia Cooperative Extension, Virginia Tech, and Virginia State University.
Virginia Cooperative Extension is a partnership of Virginia Tech, Virginia State University, the U.S. Department of Agriculture (USDA), and local governments, and is an equal opportunity employer. For the full non-discrimination statement, please visit ext.vt.edu/accessibility.
Publication Date
April 30, 2025
