

The Art of Bonsai
ID
426-601 (SPES-800P)
 EXPERT REVIEWED
Bonsai is an art form that stems from ancient Asian culture, originating in China and developed by the Japanese. In the 13th century, the Japanese collected and potted wild trees that had been dwarfed by nature. These naturally formed miniatures were some of the first bonsai.
A bonsai (pronounced “bone-sigh”) is literally a “tree in a pot,” which further imitates, in miniature, the appearance of an old tree in nature. Old specimens in nature, unlike juvenile trees, have compact, rounded tops and horizontal or drooping branches, which make them appear aged and graceful. There are about 10 sizes of bonsai, ranging from under 2 inches to over 60 inches in height.
Not all plants are equally effective as bonsai. To produce a realistic illusion of a mature tree, all parts of the ideal bonsai - trunk, branches, twigs, leaves, flowers, fruits, buds, roots - should be in perfect proportion with the size of the tree. Plants used for bonsai should have small leaves or leaves that become small under bonsai culture. Plants with overly large leaves, such as the avocado, will look out of proportion if chosen for bonsai. Sycamores also develop leaves that are too large. Certain species of both maple and elm trees usually respond well to bonsai culture and develop leaves that are proportionate. Among the plants with small leaves and needles appropriate for bonsai are spruce, pine, zelkova, and pomegranate. Leaves will miniaturize naturally the longer a tree grows in a shallow container, but one must still begin with a relatively small-leafed type.
Plants chosen for bonsai should have attractive bark, and the trunk must give the illusion of maturity. The trunk should have girth but must remain in proportion to the entire tree and should taper gradually toward the top of the tree. An ideal trunk has good buttress rootage at the base, and graceful movement as it rises to the apex.
Branches that occur lower down on the trunk should be the longest, and biggest in diameter, with branches growing higher on the trunk becoming successively shorter and smaller in diameter. This imitates the natural appearance of a tree, suggesting that the lowest branches are the oldest (biggest/longest), and higher branches, having grown more recently, are smaller and shorter.
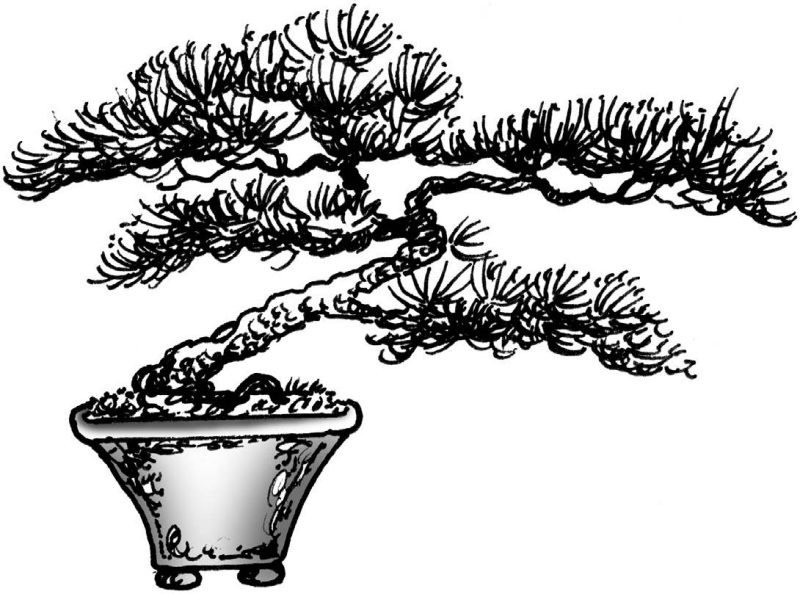
Bonsai can be classified into many styles, of which the most common are: formal upright, informal upright, slanting, cascade, and semicascade. These classifications are based on the overall shape of the tree and how much the trunk slants away from an imaginary vertical axis. (Bonsai may also be planted as forests.)
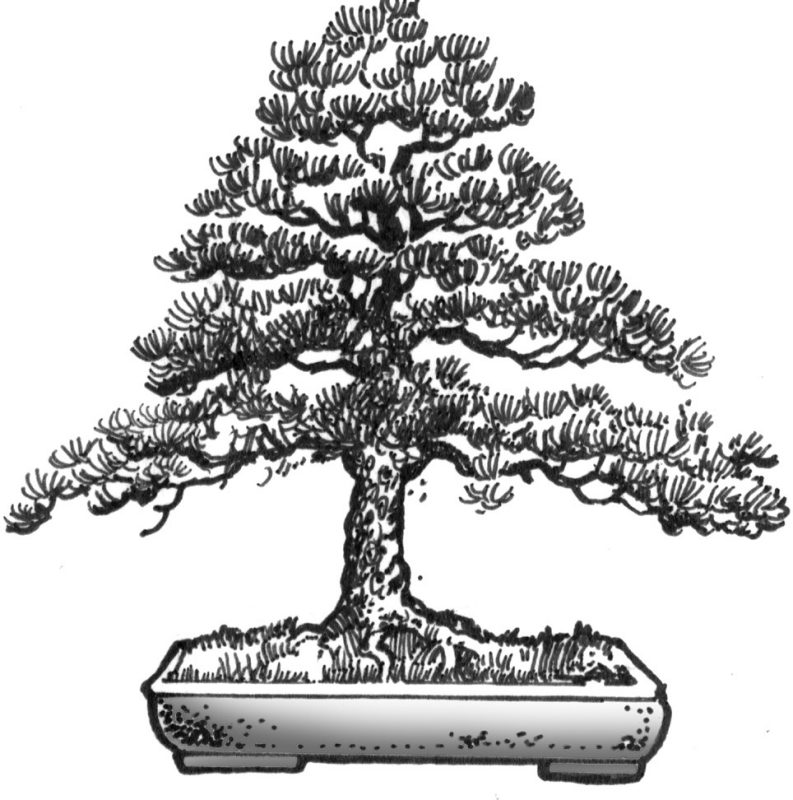
The formal upright style (Figure 1) is one type that is considered to be easy for the novice bonsai grower. This style features a straight trunk and a lower bottom branch that extends farther from the trunk than the opposite branch.
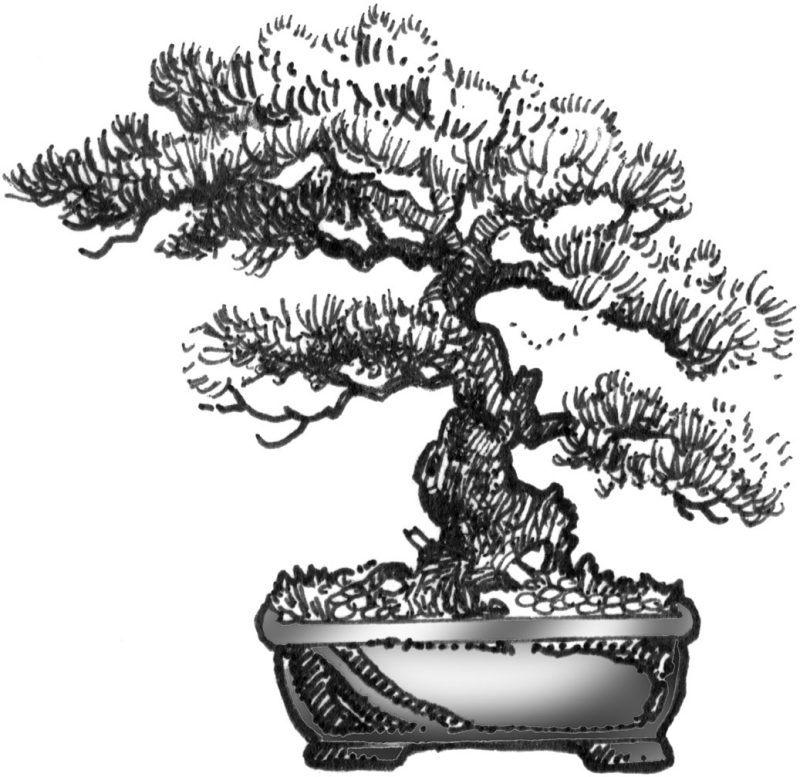
The informal upright style (Figure 2) is the best choice for beginners since the creation of this type teaches the most about bonsai design. The trunk is upright, but curves rather than straight, usually forming a zigzag pyramidal shape. Major branches occur at the angles where the trunk bends, and the apex is aligned over the base of the trunk regardless of the directional shifts in the trunk. Achieving the alignment of the trunk base and apex makes the tree asymmetrically balanced.
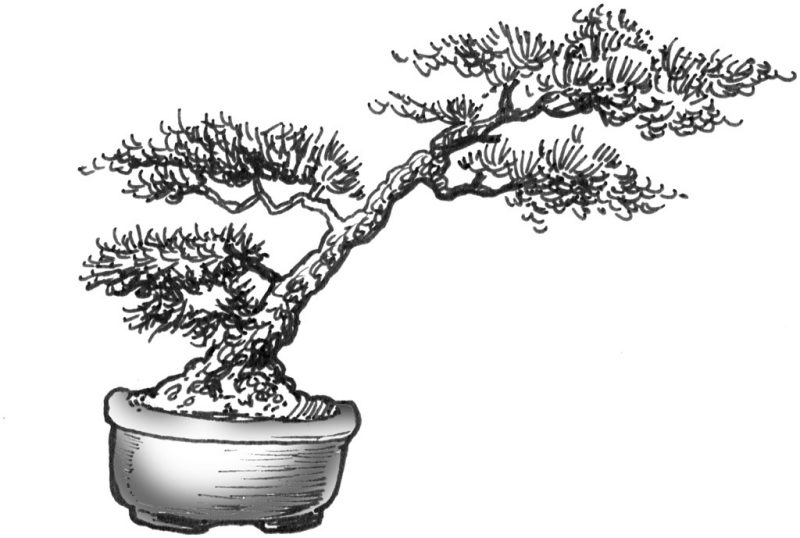
In the slanting style (Figure 3), the trunk has a single more acute angle than in the informal upright style. The lowest branch spreads in a direction opposite to that in which the tree slants.
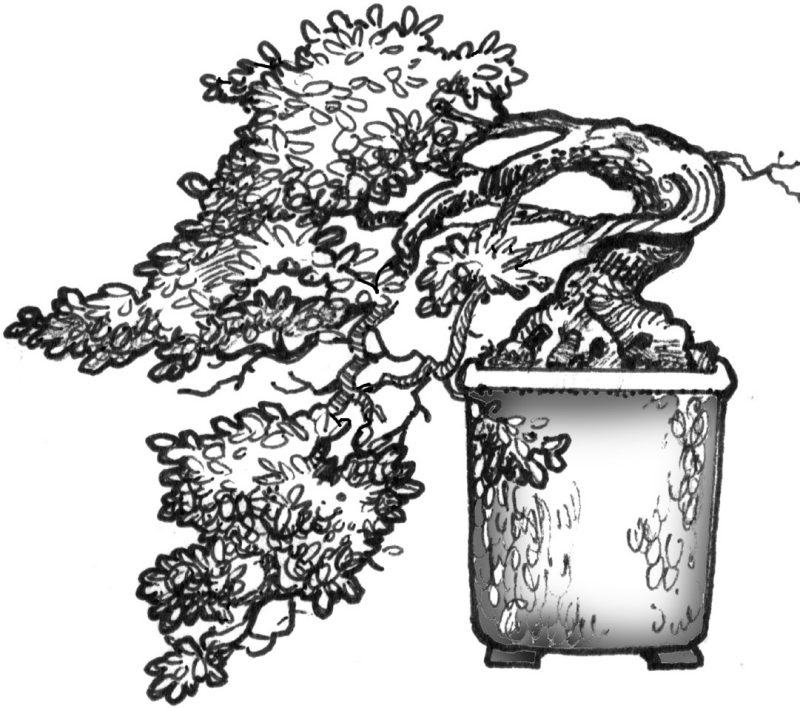
The cascade style (Figure 4) of bonsai represents a natural tree growing down the face of an embankment. A cascaded planting usually looks best in a deep round or hexagonal container.
The semicascade style (Figure 5) has a curving trunk that does not reach the bottom of the container, as in the cascade style. Prostrate junipers and flowering plants adapt well to both of these styles.
Bonsai Plant Guide
Trees and shrubs are suitable for traditional bonsai. Specialty nurseries often have a wide selection of dwarf and semidwarf varieties of many species. Dwarf plants, however, do not always convey the same impression as their full-size counterparts because their growth habits are quite different. Some trees and shrubs that work well as bonsai are azalea, beech, boxwood, ginkgo, maple, oak, pine, wisteria, and zelkova.
Azalea
- Satsuki azalea, Rhododendron indicum
- Kurume azalea, Rhododendron obtusum
Beech
- American, Fagus grandifolia
- European, Fagus sylvatica
Boxwood
- Buxus species
Elm
- Chinese, Ulmus parvifolia (many small-leaved cultivars)
Firethorn
- Pyracantha species
Ginkgo
- Ginkgo biloba
Hawthorn
- English, Crataegus laevigata
- Washington, Crataegus phaenopyrum
Heather
- Scotch heather, Calluna vulgaris
Hornbeam
- American, Carpinus caroliniana (for large bonsai)
- Korean, Carpinus turczaninovii
- Japanese, Carpinus japonica
Ivy
- English ivy, Hedera helix and cultivars
Maple
- Japanese, Acer palmatum (use palmate rather than dissectum type, preferably a seedling, not a grafted tree)
- Amur, Acer tataricum “ginnala”
- Hedge, Acer campestre
- Trident, Acer buergerianum
Oak
- Willow oak, Quercus phellos
Pine
- Austrian, Pinus nigra
- Bristlecone, Pinus aristata
- Japanese red, Pinus densiflora
- Japanese white, Pinus parviflora
- Japanese black, Pinus thunbergiana
- Mugo, Pinus mugo
- Ponderosa pine, Pinus ponderosa
- Scots (Scotch), Pinus sylvestris
- White, Pinus strobus (dwarf varieties)
Wisteria
- Japanese, Wisteria floribunda
Yew
- Taxus species and cultivars
Zelkova
- Japanese, Zelkova serrata
American gardeners have taken bonsai concepts and applied them to houseplants. By combining traditional procedures for handling houseplants with bonsai concepts of design, growers have created different bonsai styles. The following woody plants (native to the tropics and subtropics of the world) have been grown as indoor bonsai. These plants can be obtained from either local or specialized nurseries.
Citrus
- Citrus species (calamondin, kumquat, lemon, lime, orange, and tangerine)
Ficus
- Indian, Ficus retusa
- Chinese banyan, Ficus microcarpa
- Willow leaf ficus, Ficus neriifolia
Fig
- Mistletoe, Ficus diversifolia
Holly
- Miniature, Malpighia coccigera
Jacaranda
- Jacaranda mimosifolia
Jade
- Crassula species
Jasmine
- Jasminum parkeri
Mexican Heather
- Elfin, Cuphea hypssopifolia
Myrtle
- Common, Myrtus communis
Natal Plum
- Carissa grandiflora
Olive
- Common, Olea europaea
Orchid Tree
- Pink Orchid Tree, Bauhinia variegata
Poinciana
- Royal, Delonix regia
Pomegranate
- Dwarf, Punica granatum ‘Nana’
Popinac
- White, Leucaena leucocephala
Powderpuff Tree
- Calliandra surinamensis
Serissa (Snow Rose, Tree of a Thousand Stars)
- Serissa foetida
Creating Your Own Bonsai
Plant Selection
It is safest to begin with common plants that do well in your area. Be sure that the plants you consider meet the requirements for good bonsai. Reputable bonsai vendors will help you select appropriate species. Some old favorites for bonsai specimens are Sargent juniper (Juniperus chinensis ‘Sargentii’), Japanese black pine (Pinus thunbergiana), Japanese wisteria (Wisteria floribunda), Chinese wisteria (Wisteria sinensis), Japanese flowering cherry (Prunus yedoensis), and Japanese or sawleaf zelkova (Zelkova serrata). Nursery stock can be a very good selection since the plant’s roots have already become accustomed to being containerized. Look for well-rooted specimens with good branches.
Plants for bonsai can be collected from the wild, but it is a slow method and there are many unknown factors. It is difficult to tell the age of a plant found in the wild, and since they must be collected while dormant, it is also difficult to be sure that the specimen is healthy. Take all the equipment needed to keep the plant in good condition after digging. This includes plastic bags to wrap the root ball, moss to pack around the roots, and water to keep the specimen moist if it cannot be replanted soon after digging. Don’t forget the crowbar; roots are sometimes wrapped securely around rocks.
Be sure to have permission before digging plants on property other than your own, and don’t forget to check the endangered species list for protected plants before you begin. It is not legal to take plants from national parks and other conserved areas.
After the plant is selected, dug, and brought home, plant it in a protected area in your garden. Water the plant and feed it sparingly. After one year, it is ready to be placed in a training container. A light pruning of the branches can take place at potting time, but training should not begin for another year.
It is possible to propagate your own bonsai. It is a slow method, but it has the advantage of letting you shape the plant from the very beginning. Plant seedlings in the ground outside so that the trunks will develop rapidly. They may need to stay outdoors for two to five years. Each spring, dig up the plant and prune its roots as you would if it were potted.
Bonsai can also be started from cuttings. Make cuttings in late spring before the buds open. Some plants that propagate easily from cuttings are olive, willow, cotoneaster, firethorn, azalea, and boxwood. Plants can also be propagated by layering and grafting, but these methods are not recommended for the beginner.
The Front View
Choose a front view for the bonsai from which the trunk is most advantageously displayed, and from which the tree will be exhibited. Approximately the lower half of the trunk should be visible without branches, except to the sides from the front view. Be certain, however, that the tree has good three-dimensional development on the sides and in back.

Shaping the Bonsai
Before deciding on the shape of your bonsai, study the tree carefully and consider the species’ natural form. To achieve an impression of age and reality, observe the way mature trees of the same kind grow in their natural setting. Decide on the final shape and size of your bonsai before beginning. Make a rough sketch of what you wish to create and use it as a guide.
Bonsai are shaped by pruning, wiring, and pinching. Pruning and wiring create the tree’s structure by shaping its woody parts, whereas pinching back the long end of soft foliage helps side buds to develop, making a branch bushier or twiggier (this is called “ramification”). Pruning is less stressful for the tree than wiring, but both are usually necessary to achieve refinement. Pruning should be done with a concave cutter, a special bonsai tool for making sharp cuts without collars (stubs). Deciduous trees can be pruned back quite severely in late spring or summer to promote adventitious new shoots closer to the trunk. Afterwards, they should be placed in shade until the new shoots harden. Older evergreens should be pruned back very gradually. Starting at the bottom of the trunk, remove branches that are growing straight up, those that grow inward towards the trunk, and one of two branches that grow opposite one another, after selecting the correct one to keep, usually according to an alternating (side-to-side) arrangement of branches that start near the bottom. Only after wiring should you prune to shorten the remaining branches, leaving the lower ones longer than the upper ones.
Wiring can be done at any time of year, but it is most easily done on deciduous trees in the winter when they have no leaves. Buy aluminum or annealed copper wire made for use on bonsai, which is much more pliable than regular wire.
To make the branches flexible before wiring, do not water the plant the day before you wire it. Begin at the bottom of the tree when wiring and shaping, and work upward. Anchor the end of the wire at the base of the tree by pushing it into the soil. Keep turns around the branches or trunk about one quarter inch apart, and spiral upward at a 45 degree angle. Do not wire too tightly. If a branch should snap, the ends can be rejoined if not completely broken. Wind some garden tape around the break. If a branch snaps off, prune it back at the first side branch. The wire should not be kept on the plant longer than one growing season. When removing wire, start at the end of the branch and work back carefully; using wire cutters designed for bonsai is safer than unwrapping the wire.
Bonsai Containers
All bonsai begin their development in training pots, where they stay until they have a good, fibrous root system and relatively full foliage development, which makes them look like bonsai rather than just a shrub or tree in a pot. Training pots help trees grown for bonsai make the transition between a deep nursery container, a balled and burlapped root system, or landscape, to the shallow confinement of a bonsai pot. Above all, resist the urge to collect (dig) a tree and put it directly into a bonsai pot, where its chances of survival are slight. The best sort of training pot is often a large-diameter nursery container with good drainage holes, and with its top cut off to a depth of 8-10 inches. During its time in a training pot, the tree should be grown in coarse, fast-draining soil. Traditional bonsai pots, available at bonsai nurseries, and some large nurseries and import stores, are round, oval, square, rectangular, or hexagonal. Some are unglazed on the exterior (traditional for evergreens), and some are glazed and are suitable for most types of trees, as long as the pot complements but does not compete with the tree. Pots for cascade, semi-cascade, and flowering bonsai are deeper than others. All bonsai pots have large drainage holes, which are essential for the rapid drainage that promotes root health, but they must be covered with screening on the inside bottom of the pot to prevent coarse soil from washing away with the draining water. Bonsai containers should be unglazed on their inside walls and on the bottoms, both inside and out.

Before repotting, familiarize yourself with the proper time of year to repot specific tree types. For example, junipers can be repotted at any time during the growing season, as they grow throughout it. Pines and most other evergreens must be repotted during the late winter before they show signs of new growth. Most deciduous trees should be repotted before they leaf out in very early spring.
A bonsai that is ready for a bonsai pot should not be transplanted into it until all short-term foliage work (pruning, wiring, pinching) has been completed. This precaution prevents the tree’s newly placed roots from being dislodged. At the time of “potting up,” turn the bonsai container so that its front side is toward you roughly at eye-level. Hold the tree with its front view toward you and place the base of the trunk very slightly off-center to the opposite side from which the dominant visual weight of its branches occurs. In other words, if most branches occur on the left when viewing the tree from the front, place the base of the trunk slightly off-center to the right. This maintains the asymmetrical balance that is the basis of Japanese design. Comb out the roots, pruning back (shortening) those that have become wiry or stiff deep in the soil. Keep, but trim, fibrous roots and spread them out inside the container. Add coarse porous soil designed for bonsai. Bonsai soil mixes typically consist of clay, pumice, and lava particles of even sizes, and is available from bonsai vendors. Water the tree thoroughly and keep it in a dry protected place for the next few days. Check it for soil moisture daily, but do not water it until the soil on top begins to feel a bit dry.
Seasonal Care
Bonsai from forest trees must live outdoors except for short periods of time when they may be brought inside for viewing. These indoor periods should only be for two or three hours and should not occur at all in summer unless the interior is well ventilated.
In the summer, bonsai need cool nights, sunny days, and mist or rain almost daily. If your climate does not offer these conditions naturally, you must supply them. Avoid any extremes in temperature, light, rain, and wind. Water the entire plant daily, but do not let them become water logged. Placing bonsai on a slatted stand in the garden is a good way to keep drainage conditions optimum. Learn the conditions (culture) that your bonsai requires. Junipers and pines need full sun all day. Maples, elms and boxwoods need morning sun and afternoon shade, etc.
Apply fertilizer only before and during active growth. A houseplant fertilizer diluted from one quarter to one half strength will suffice.
In the fall, bonsai must be prepared for the winter. Slow the growth of the plants by watering less frequently and discontinuing fertilizer application. Do not prune or cut any branches after mid-August.
Winter’s low temperatures and drying winds can easily kill bonsai. If the winter temperature drops below 28ºF, bonsai must be protected by a greenhouse, pit, or cold- frame. However, do not overprotect the plants; they must be kept cool to stay dormant. Don’t forget to water them while inside the coldframe. Winter watering may be necessary only once a week. More bonsai are killed by overwatering than by desiccation.
In the spring, start new bonsai, prune the old ones, and continue training measures. The remaining part of the growing season is used for the plants’ adjustments to these practices.
Displaying Bonsai
Remember that simplicity is very important in Japanese aesthetics and bonsai should be displayed in an uncluttered environment where the details of the plant can be appreciated. This is, after all, a wonder of nature - trees and shrubs made miniature. Gravel beds in the garden are good backgrounds for bonsai outdoors, and a simple stand or table before a blank wall makes an appropriate setting indoors. Make sure that the front view faces the viewer.
When visiting the Washington, D.C. area, be sure to visit the bonsai collection at the National Arboretum. There are beautiful specimens on display that are hundreds of years old. The setting of the display is especially appropriate and may give you ideas for your own bonsai projects.
(Originally adapted for use in Virginia from USDA H & G Bulletin #206, and amended and updated in January 2001 by Jerrie Pike of Higo Gardens Bonsai, Christiansburg, VA)
Virginia Cooperative Extension materials are available for public use, reprint, or citation without further permission, provided the use includes credit to the author and to Virginia Cooperative Extension, Virginia Tech, and Virginia State University.
Virginia Cooperative Extension is a partnership of Virginia Tech, Virginia State University, the U.S. Department of Agriculture (USDA), and local governments, and is an equal opportunity employer. For the full non-discrimination statement, please visit ext.vt.edu/accessibility.
Publication Date
March 18, 2026
