Propagation by Cuttings, Layering and Division
ID
426-002 (SPES-683P)
 EXPERT REVIEWED
Asexual propagation is the best way to maintain some species, particularly an individual that best represents that species. Clones are groups of plants that are identical to their one parent and that can only be propagated asexually. The Bartlett pear (1770) and the Delicious apple (1870) are two examples of clones that have been asexually propagated for many years.
The major methods of asexual propagation are cuttings, layering, division, and budding/grafting. Cuttings involve rooting a severed piece of the parent plant; layering involves rooting a part of the parent and then severing it; and budding and grafting are joining two plant parts from different varieties.
Rooting Media
The potting soil, or medium in which a plant grows, must be of good quality. It should be porous for root aeration and drainage, but also capable of water and nutrient retention. In order for a plant to form a new root system, it must have a ready moisture supply at the cut surface. Oxygen, of course, is required for all living cells. The coarse-textured media choices often meet these requirements. Most commercially prepared mixes are termed artificial, which means they contain no soil. The basic ingredients of such a mix are sphagnum peat moss and vermiculite, both of which are generally free of diseases, weed seeds, and insects.
Rooting media for asexual propagation should be clean and sterile. Cuttings are not susceptible to damping-off, but they are attacked by other fungi and bacteria which may come along in the medium. Most commercially prepared media are clean when purchased.
The media should be low in fertilizer. Excessive fertility will damage or inhibit new roots. High-quality artificial mixes sometimes contain slow-release fertilizers.
Coarse perlite alone can be used to start some cuttings. This doesn’t hold much water for long, but it is fine for rooting cuttings of cactus-type plants which would ordinarily rot in higher moisture media. Coarse vermiculite alone has excellent water-holding capacity and aeration, but may dry out rapidly via evaporation if not covered in some way. A mix of 50% peat moss and 50% perlite favors good aeration. An equal mix of peat moss, vermiculite, and perlite is also good and favors moisture retention.
Plain water can be used to propagate some cuttings. This is possible and actually works quite well for some species which root easily. It certainly provides the needed moisture, but if the water is not changed on a weekly basis, it will become stagnant, oxygen deficient, and inhibitory to rooting. Furthermore, roots produced in 100% water are different from those produced in solid media; they may undergo greater transplant shock with a greater incidence of death. So, it is not the most desirable method for most plants, but certainly feasible.
Rooting Enhancement Conditions
Once you’ve selected the right medium, your first priority is to get roots produced as quickly as possible. The consequences of slow rooting may be death because the cutting must rely on its limited water reserves. Water is required for major chemical reactions in plants which will be shut down in its absence. Even though the exposed cells on the cut surface of the cutting ordinarily transport water throughout the plant, they are not equipped to adequately absorb it from the medium. This can only be done in most plants by roots, and particularly root hairs. Root hairs are tiny, single cell projections from the root ends or tips.
Make sure the medium is moist prior to inserting cuttings. If incompletely moist, then the cut surface may contact a dry pocket and have its own water absorbed away by the medium component. Try to keep both the air and medium temperature warm: 70-75OF. Higher temperatures enhance growth, but excessively high temperatures do not allow for photosynthesis to keep up with food breakdown in normal cell energy use (respiration). You can buy electric heating pads to put beneath containers holding cuttings to maintain a constant temperature.
Get air circulation around the cuttings as much as possible to discourage fungal growth. Place in bright, but not direct light. An east window is fine but a west window is too warm and a south facing window too bright. North is too dim.
One way to provide good environmental conditions for asexual propagation by cuttings is through the use of a mist bed. This system sprays a fine mist of water over the cuttings once every few minutes, and the time is adjustable. It should only be on during the day, as nighttime operation would keep the medium too wet and encourage rotting. Misting inhibits transpiration and forces the plant to conserve water while it forms new roots. If a mist system is unavailable, one can be imitated in a small propagation tray in the home. Choose an appropriate medium, moisten it, and place it in a tray. Place the tray in a perforated or slitted clear plastic bag. This increases the relative humidity and inhibits water loss by the plant and medium, yet allows air circulation. Tug gently at the cuttings after 2-3 weeks to test for rooting and transplant to individual pots when roots resist your tugs. Dig them out, do not pull them out! Different plants require different rooting times, so do not expect them all to root at the same time.
Cuttings
Many types of plants, both woody and herbaceous, are frequently propagated by cuttings. A cutting is a vegetative plant part which is severed from the parent plant in order to regenerate itself, thereby forming a whole new plant. Take cuttings with a sharp blade to reduce injury to the parent plant. Dip the cutting tool in rubbing alcohol or a mixture of one part bleach to nine parts water to prevent transmitting diseases from infected plant parts to healthy ones. Remove flowers and flower buds to allow the cutting to use its energy and stored carbohydrates for root and shoot formation rather than fruit and seed production. With large-leaved cuttings (i.e., Rhododendron) and limited space in the propagation container, trimming up to half the leaf length can improve efficiency, as well as light and air circulation for all the cuttings. To hasten rooting, increase the number of roots, or to obtain uniform rooting (except on soft, fleshy stems), use a rooting hormone, preferably one containing a fungicide. Prevent possible contamination of the entire supply of rooting hormone by putting some hormone in a separate container for dipping cuttings. Discard this hormone after all the cuttings are treated.
Place stem and leaf cuttings in bright, indirect light. Root cuttings can be kept in the dark until new shoots appear.
Stems Cuttings
Numerous plant species are propagated by stem cuttings. Most can be taken throughout summer and fall, but stem cuttings of some woody plants root better if taken in the fall or in the dormant season. Success with herbaceous plants is generally enhanced when done in the spring; these plants are actively growing then, and more apt to root quickly on their own. There are several different types of stem cuttings depending on the part of the stem needed. At least one node (the point on a stem where leaves are attached and buds form) should be below the media surface. Although some plants root at internodes (the space between nodes), others only root at nodal tissue.
Tip cuttings
Detach a 2- to 6-inch piece of stem, including the terminal bud. Make the cut just below a node. Remove lower leaves that would touch or be below the medium. Dip the stem in rooting hormone if desired. Gently tap the end of the cutting to remove excess hormone. Make a hole in the medium with a pencil or pot label, and insert the cutting deeply enough into the media to support itself.
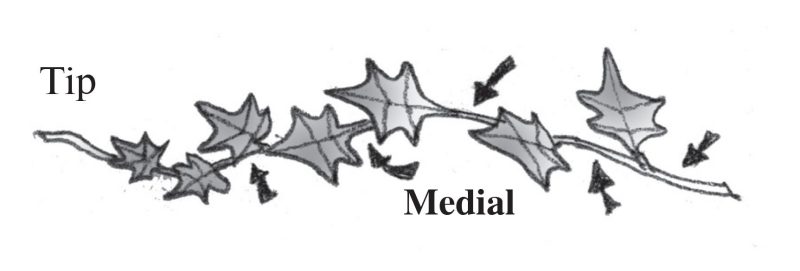
Medial cuttings (also stem-section cuttings)
Make the first cut just above a node, and the second cut just below a node 2 to 6 inches down the stem. Prepare and insert the cutting as you would a tip cutting. Be sure to position right side up. Buds are always above leaves. Make sure the cutting is inserted base down.
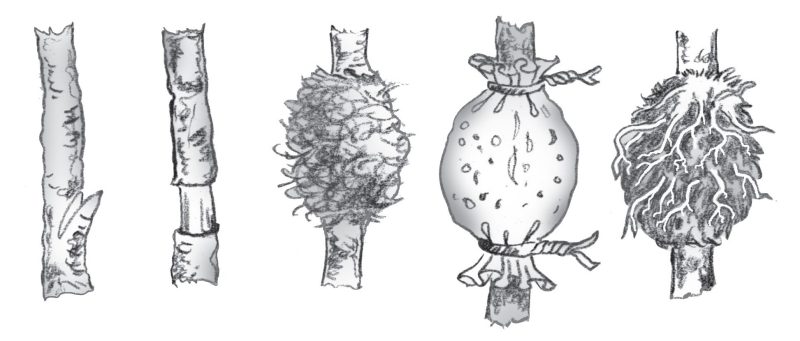
Cane cuttings
Cut cane-like stems into sections containing one or two eyes, or nodes. Dust ends with fungicide or activated charcoal. Allow to dry several hours. Lay horizontally with about half of the cutting below the media surface, eye facing upward. Cane cuttings are usually potted when roots and new shoots appear, but new shoots from dracaena and croton are often cut off and rerooted in sand.

Single Eye
The eye refers to the bud which emerges at the axil of the leaf at each node. This is used for plants with alternate leaves when space or stock material are limited. Cut the stem about 1/2 inch above and 1/2 inch below a node. Place the cutting horizontally or vertically in the medium with the node just touching the surface.

Double Eye
This is used for plants with opposite leaves when space or stock material is limited. Cut the stem about 1/4 inch above and 1/4 inch below the same node. Insert the cutting vertically in the medium with the node just touching the surface.

Heel cutting
This method uses stock material with woody stems efficiently. Make a shield-shaped cut about halfway through the wood around a leaf and axial bud. Insert the shield horizontally into the medium so that it is completely covered. Remove any leaf blade but keep a portion of the petiole intact for ease in handling this small cutting.

Leaf Cuttings
Leaf cuttings are used almost exclusively for a few indoor plants. Leaves of most plants will either produce a few roots but no plant, or just decay.
Whole leaf with petiole
Detach the leaf and up to 1/2 inches of petiole. Insert the lower end of the petiole into the medium. One or more new plants will form at the base of the petiole. The leaf may be severed from the new plants when they have their own roots, and the petiole can be reused. (Example: African violet).

Whole leaf without petiole
This is used for plants with sessile leaves (no stalk or petiole). Insert the cutting vertically into the medium. A new plant will form from the axillary bud. The leaf may be removed when the new plant has its own roots. (Example: donkey’s tail).
Split vein
Detach a leaf from the stock plant. Slit its veins on the lower leaf surface. Lay the cutting, lower side down, on the medium. New plants will form at each cut. If the leaf tends to curl up, hold it in place by covering the margins with the rooting medium. (Example: Rex begonia).

Leaf sections
This method is frequently used with snake plant and fibrous rooted begonias. Cut begonia leaves into wedges with at least one vein. Lay leaves flat on the medium. A new plant will arise at the vein. Cut snake plant leaves into 2-inch sections. Consistently make the lower cut slanted and the upper cut straight so you can tell which is the top. Insert the cutting vertically. Roots will form fairly soon, and eventually a new plant will appear at the base of the cutting. These and other succulent cuttings will rot if kept too moist. (Note that with variegated snake plant, the new shoot will develop from cells that do not display the variegation.)


Root Cuttings
Root cuttings are usually taken from 2- to 3-year-old plants during their dormant season when they have a large carbohydrate supply. Root cuttings of some species produce new shoots, which then form their own root systems, while root cuttings of other plants develop root systems before producing new shoots.

Propagation Methods - Cuttings
Stem
- Tip — used for almost all house plants except those that don’t form stems such as African violet
- Medial — same as tip
- Cane — dieffenbachia, swiss cheese plant, aglaonema
- Single Eye — alternate leaf plants such as Devil’s ivy
- Double Eye — opposite leaf plants such as soleus
- Heel — dieffenbachia
Leaf
- Whole Leaf with Petiole — gloxinia, African violet, peperomia, begonia
- Without Petiole — Donkey’s tail, jade, ghost plant, peperomia
- Split Vein — begonia
- Leaf Sections — sansevieria begonia
Root
- Large — horse radish
- Small — bleeding heart, geraniums, ming aralia
Plants with large roots: Make a straight top cut. Make a slanted cut 2 to 6 inches below the first cut. Store about 3 weeks in moist sawdust, peat moss, or sand at 40˚F. Remove from storage. Insert the cutting vertically with the top approximately level with the surface of the rooting medium. This method is often used outdoors. (Example: horse radish).
Plants with small roots: Take 1- to 2-inch sections of roots. Insert the cuttings horizontally about 1/2 inch below the medium surface. This method is usually used indoors or in a hotbed. (Example: bleeding heart).

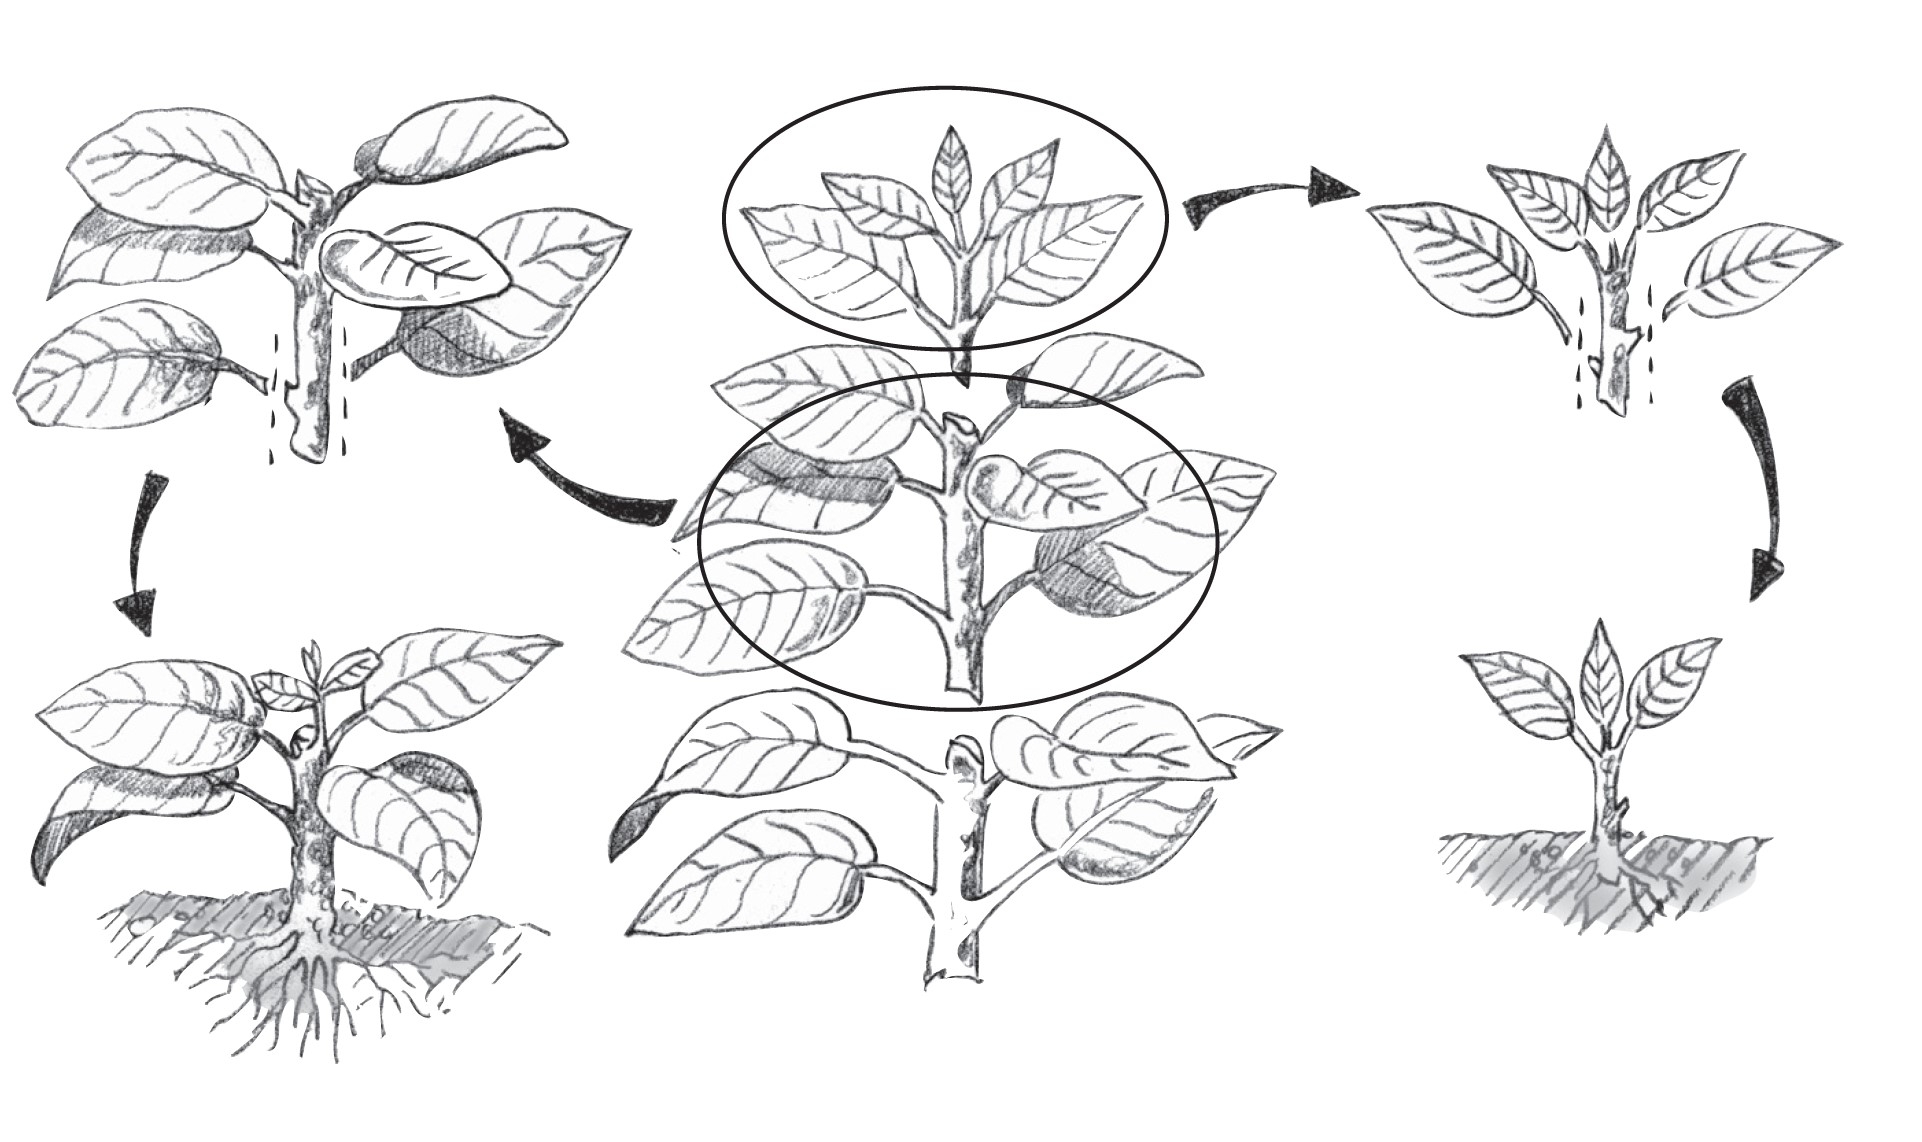
Layering
Stems still attached to their parent plants may form roots where they touch a rooting medium. Severed from the parent plant, the rooted stem becomes a new plant. This method of vegetative propagation, called layering, promotes a high success rate because it prevents the water stress and carbohydrate shortage that plague cuttings.
Some plants layer themselves naturally, but sometimes plant propagators assist the process. Layering may be enhanced by wounding one side of the stem or by bending it very sharply. The rooting medium should always provide aeration and a constant supply of moisture.
Tip layering
Dig a hole 3 to 4 inches deep. Insert the shoot tip and cover it with soil. The tip grows downward first, then bends sharply and grows upward. Roots form at the bend, and the recurved tip becomes a new plant. Remove the tip layer and plant it in the early spring or late fall. Examples: purple and black raspberries, trailing blackberries.

Simple layering
Bend the stem to the ground. Cover part of it with soil, leaving the last 6 to 12 inches exposed. Bend the tip into a vertical position and stake in place. The sharp bend will often induce rooting, but wounding the lower side of the branch or loosening the bark by twisting the stem may help. Examples: forsythia, honeysuckle.

Compound layering
This method works for plants with flexible stems. Bend the stem to the rooting medium as for simple layering, but alternately cover and expose stem sections. Wound the lower side of the stem sections to be covered. Examples: heart-leaf philodendron, pothos.

Compound layering
This method works for plants with flexible stems. Bend the stem to the rooting medium as for simple layering, but alternately cover and expose stem sections. Wound the lower side of the stem sections to be covered. Examples: heart-leaf philodendron, pothos.
Mound (stool) layering
Cut the plant back to 1 inch above the ground in the dormant season. Mound soil over the emerging shoots in the spring to enhance their rooting. Examples: gooseberries, apple rootstocks.

Air layering
Air layering is used to propagate some indoor plants with thick stems, or to rejuvenate them when they become leggy. Slit the stem just below a node. Pry the slit open with a toothpick. Surround the wound with wet unmilled sphagnum moss. Wrap plastic or foil around the sphagnum moss and tie in place. When roots pervade the moss, cut the plant off below the root ball.
| Layering | Plant |
|---|---|
| Tip | purple and black raspberries, trailing blackberries |
| Simple | forsythia, honeysuckle, spider plant, most vine-type plants (philodendron, grape ivy, devil’s ivy, swedish ivy, etc.) |
| Compound | heartleaf philodendron, pothos |
| Mound | gooseberries, apple rootstocks |
| Air Layering | plants with rigid stems such as dieffenbachia, ficus, rubber |
Division
Propagation from the following plant parts can be considered a modification of layering, as the new plants form before they are detached from their parent plants.
Stolons and runners
A stolon is a horizontal, often fleshy stem that can root, then produce new shoots where it touches the medium. A runner is a slender stem that originates in a leaf axil and grows along the ground or downward from a hanging basket, producing a new plant at its tip. Plants that produce stolons or runners are propagated by severing the new plants from their parent stems. Plantlets at the tips of runners may be rooted while still attached to the parent, or detached and placed in a rooting medium. Examples: strawberry, spider plant.

Offsets
Plants with a rosetted stem often reproduce by forming new shoots at their base or in leaf axils. Sever the new shoots from the parent plant after they have developed their own root system. Unrooted offsets of some species may be removed and placed in a rooting medium. Some of these must be cut off, while others may be simply lifted off the parent stem. Examples: date palm, haworthia, bromeliads, many cacti.

Seperation
Separation is a term applied to a form of propagation by which plants that produce bulbs or corms multiply.
Bulbs
New bulbs form beside the originally planted bulb. Separate these bulb clumps every 3 to 5 years for largest blooms and to increase bulb population. Dig up the clump after the leaves have withered. Gently pull the bulbs apart and replant them immediately so their roots can begin to develop. Small, new bulbs may not flower for 2 or 3 years, but large ones should bloom the first year. Examples: tulip, narcissus.

Corms
A large new corm forms on top of the old corm, and tiny cormels form around the large corm. After the leaves wither, dig up the corms and allow them to dry in indirect light for 2 or 3 weeks. Remove the cormels, then gently separate the new corm from the old corm. Dust all new corms with a fungicide and store in a cool place until planting time. Examples: crocus, gladiolus.

Crowns
Plants with more than one rooted crown may be divided and the crowns planted separately. If the stems are not joined, gently pull the plants apart. If the crowns are united by horizontal stems, cut the stems and roots with a sharp knife to minimize injury. Divisions of some outdoor plants should be dusted with a fungicide before they are replanted. Examples: snake plant, iris, prayer plant, day lilies.
| Division | Plant |
|---|---|
| Stolons/Runners | strawberry, begonia, spider plant |
| Offsets | date palm, haworthia, bromeliads, cacti, and succulents |
| Separation | Plant |
|---|---|
| Bulb | tulip, narcissus, hyacinth, amaryllis, lilies |
| Corm | crocus, gladiolus, freesia |
| Crowns | sansevieria, iris, prayer |
Asexual Propagation of Perennials
Division
Most perennials left in the same place for more than 3 years are likely to be overgrown, overcrowded, have dead or unsightly centers, and need basic fertilizer and soil amendments. The center of the clump will grow poorly, if at all, and the flowers will be sparse. The clump will deplete the fertility of the soil as the plant crowds itself. To divide mature clumps of perennials, select only vigorous side shoots from the outer part of the clump. Discard the center of the clump. Divide the plant into clumps of three to five shoots each. Be careful not to over-divide; too small a clump will not give much color the first year after replanting. Divide perennials when the plants are dormant just before a new season of growth, or in the fall so they can become established before the ground freezes. Stagger plant divisions so the whole garden will not be redone at the same time; good rotation will yield a display of flowers each year. Do not put all the divisions back into the same space that contained the original plant. That would place too many plants in a given area. Give extra plants to friends, plant them elsewhere in the yard, or discard them.
Cuttings
Many plants can be propagated from either tip or root cuttings. Generally, tip cuttings are easier to propagate than root cuttings. Select second growth of dianthus, candytuft, and phlox for cuttings. Make tip cuttings 3 to 6 inches long. Treat the base of the cutting with a root stimulant. Leave all foliage on the cutting except the part that will be below the soil line. Insert one cutting per peat pot. Place peat pots of tip cuttings in a lightly shaded place. Cover with a sheet of clear plastic. Check regularly to make sure the cuttings do not dry out. When cuttings do not pull easily out of the soil, they have begun to root. Make holes in the plastic sheet to increase the exposure of the cuttings to the air. This will harden the cuttings. Every few days, enlarge the holes or make new ones.
Make root cuttings of phlox, baby’s breath, and oriental poppy. Dig the plants in late summer after they have bloomed. Select pencil-sized roots; cut them into 4-inch sections. Put each piece in a peat pot. Prepare a tray of peat pots as for seeds, except the soil mix should be 2 parts sand, 1 part soil, and 1 part peat moss. Water thoroughly.
Original publication reviewed by Joyce Latimer, Extension Specialist, Horticulture, Virginia Tech; Roger Harris, Virginia Tech Department of Horticulture; Alan McDaniel, Virginia Tech Department of Horticulture; and John Arbogast, Extension Agent, Roanoke, Virginia.
Virginia Cooperative Extension materials are available for public use, reprint, or citation without further permission, provided the use includes credit to the author and to Virginia Cooperative Extension, Virginia Tech, and Virginia State University.
Virginia Cooperative Extension is a partnership of Virginia Tech, Virginia State University, the U.S. Department of Agriculture (USDA), and local governments, and is an equal opportunity employer. For the full non-discrimination statement, please visit ext.vt.edu/accessibility.
Publication Date
March 20, 2025