Boiling Water Bath Canning
ID
348-594 (FST-426P)
 EXPERT REVIEWED
Introduction
You may choose to preserve food at home to save money, to have greater control over what you consume, or for the simple satisfaction of doing it yourself. Regardless of the reasons, it is important to do it safely. Using the proper equipment and following recommended guidelines and recipes can ensure that the food you preserve at home is safe and delicious.
Background Information
The boiling water bath method of home canning is recommended for processing high-acid foods. The pH is the measurement of how acidic a food is: Foods with a 4.6 pH or less are considered high-acid, and foods with more than a 4.6 pH are considered low-acid.
Examples of high-acid foods (pH less than 4.6) include:
| Apples Applesauce Apricots Berries Cherries Cranberries Fruit juices |
Peaches Pears Pickled beets Plums Rhubarb Tomatoes (see tomato section, below) Tomato juice |
Boiling water bath canning involves packing jars with food, completely covering the jars with water, heating the water to boiling (212 degrees Fahrenheit (F), 100 degrees Celsius (C)), and processing for 5 to 85 minutes, depending on the food product, style of pack, and jar size. Boiling removes the oxygen remaining in the jar, which helps to form a tight seal between the lid and the rim. The heat used for this method of canning is sufficient to kill vegetative bacterial cells found in the food.
Only high-acid food with a pH of 4.6 or less can be processed using the boiling water bath method. This is because high-acid foods prevent the growth of spores of the bacterium Clostridium botulinum, which can’t be killed by boiling. Foods with a pH more than 4.6 allow the spores to grow. If spores of C. botulinum are allowed to grow, toxin will form, and consumption of C. botulinum toxin is deadly. Symptoms from the consumption of this toxin develop within six hours to 10 days and include double and blurred vision, drooping eyelids, slurred speech, difficulty swallowing, and muscle weakness. Paralysis of breathing muscles can cause a person to stop breathing and die unless mechanical ventilation is provided. Individuals with any of these symptoms should seek immediate medical assistance.
Examples of low-acid foods (pH more than 4.6) include:
| Asparagus Beans Beets Carrots Corn Hominy Meat |
Mushrooms Okra Peas Potatoes Spinach Squash Seafood |
For information on the safe home preservation of low-acid foods or foods with a pH greater than 4.6, see “Pressure Canning,” Virginia Cooperative Extension publication 348-595.
Limitations
Boiling water bath canning can be used to preserve high-acid foods such as fruits, pickles, relishes, acidified tomatoes, fruit jellies, jams, butters, marmalades, and preserves. Always check up-to-date canning information for correct processing times. For higher altitudes, processing times will need to be extended by one minute for each 1,000 feet above sea level.
Equipment Requirements
Canner
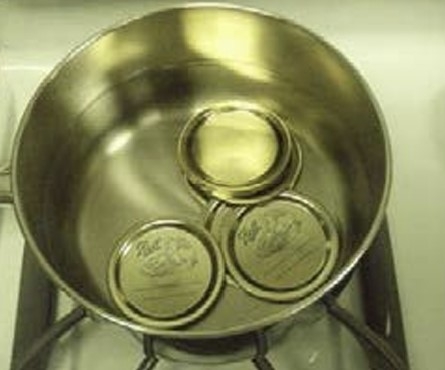
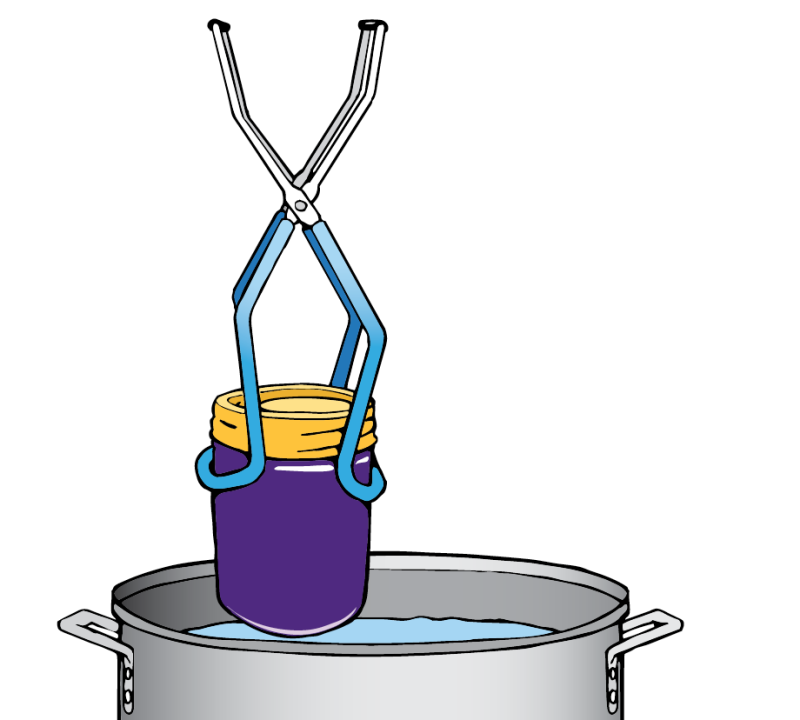
Any large metal container with a rack and a tight-fitting lid can be used as a boiling water bath canner (figure 1). The container must be deep enough for 1 to 2 inches of briskly boiling water to cover each jar. The diameter of the container must be no more than 4 inches wider than the diameter of the stove’s burner. For electric ranges, the container must have a flat bottom.
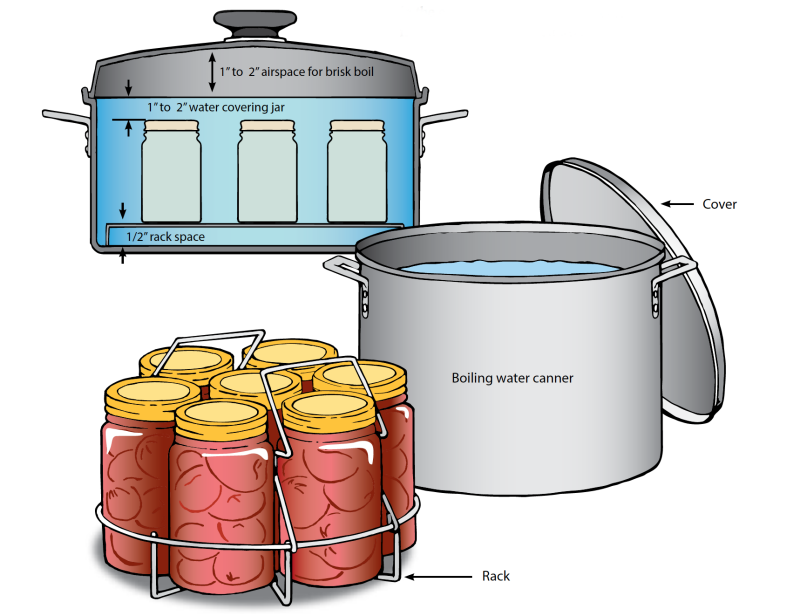
The use of a rack will prevent jars from touching the bottom of the container and will allow boiling water to circulate freely. A pressure canner can be used as a water bath canner if it is deep enough. When using a pressure canner, the lid should be used but not sealed, and the petcock (safety valve) should be open to allow steam to escape and to prevent the buildup of pressure in the canner. Wash and dry the boiling water bath canner before and after each use.
Jars and Lids
Only glass jars that have been tempered (strengthened) for heat and cold should be used in home canning. The mason-type jar is the most commonly used. Mayonnaise jars and jars from commercial foods should not be used. Jars should be free of chips or nicks because these could lead to breakage during the heating process or could prevent sealing. Jars can be purchased in various sizes ranging from one-half pint to a gallon. Most recipes have been designed to accommodate pint- and quart-size containers. Undamaged jars may be used indefinitely.
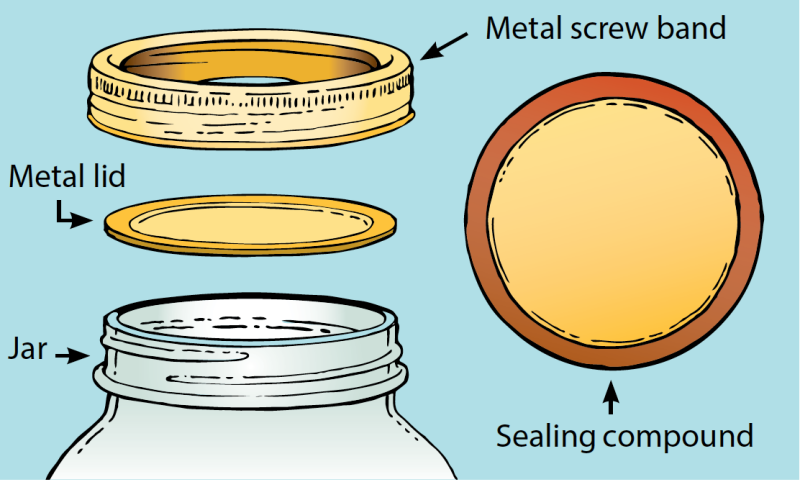
The two-piece lid, consisting of a flat disk with sealing compound around the outer edge and a separate metal screwband is the most common type of lid available (figure 2). Lids should only be used once, but screwbands may be reused. However, lids that are more than five years old, are dented, deformed, or flawed, or were previously used in the sealing of a commercial product should not be used. Follow the manufacturer’s instructions for use to ensure a good seal during processing.
Optional Utensils
Along with clean towels, hot pads, and cutting boards, there are a number of utensils that can be useful for home canning:
- Jar funnel – to pour food product into jars.
- Jar lifter – snuggly and safely grips hot jars for removal from canner.
- Bubble freer – a plastic spatula or utensil used to work bubbles out of jars.
- Lid wand – magnetic wand used to place hot boiled lids onto freshly filled jars.
- Timer – to track processing time.
Preparing Fruit for Boiling Water Bath Canning
Product Selection
In general, select fruits that are firm and ripe but not overripe. For the best results, keep the time between harvesting and canning as short as possible. Wash and rinse with water but do not allow them to soak because nutrients may be lost. Continue to wash until rinse water is clear. Peel fruit, if necessary, remove seeds, etc., and trim away bruised areas. Cut into serving-size pieces.
Salt and Sugar
The use of salt and sugar in the canning of most fruits has no preservative effect except when salt is used in brined and cured products and sugar is used in gelled products like jams and jellies. Salt is mainly added to enhance flavor. Sugar is primarily added to improve flavor, help stabilize color, and retain the shape of the fruit. Fruits canned without sugar will be softer in texture than those canned with sugar. Honey and corn syrup can be used in place of sugar. Keep in mind that honey has a distinctive flavor that will persist in the finished product.
There is no published research using artificial sweeteners in the canning process, however, it is possible to use them for sweetening the water used to cover fruits when canning. The process and result would be similar to canning in water, except there would be an additional sweetness provided by the artificial sweetener. The texture and color-preserving aspects of sugar syrup will not be provided. It is not recommended that artificial sweeteners be used when sugar is necessary for preservation, as in the case of gelled products (jams, jellies, marmalades), unless a no-sugar-needed pectin is used.
Preventing Fruits From Darkening
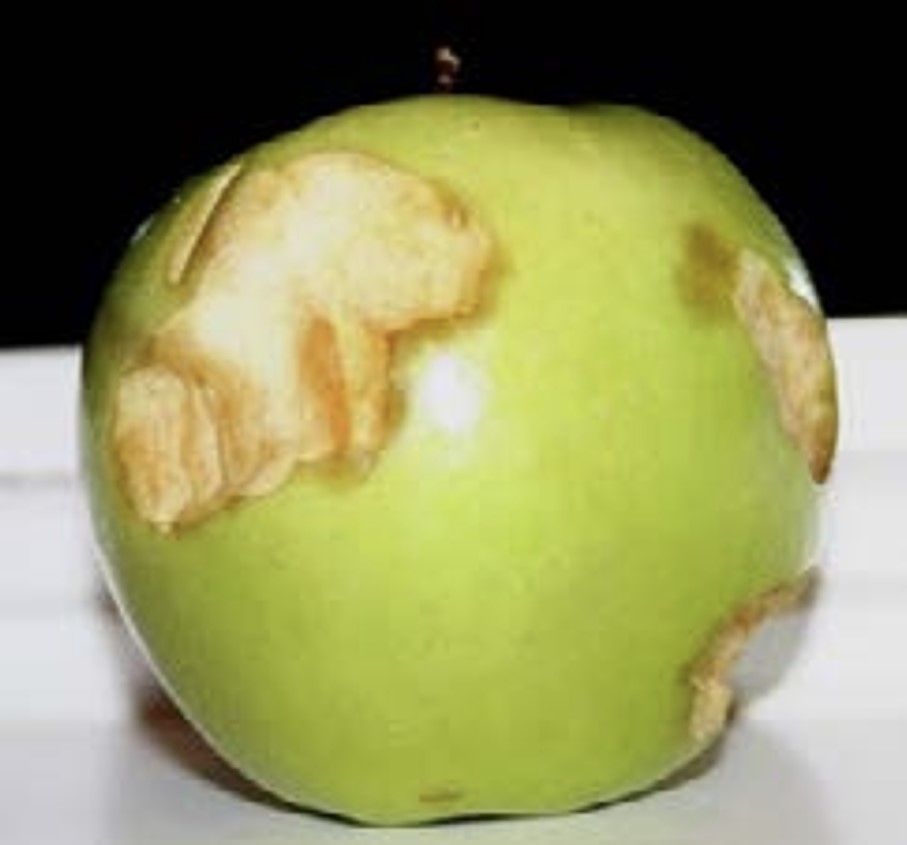
After being cut, many light-color fruits (apples, apricots, peaches, pears, etc.) may darken due to a natural enzymatic reaction (figure 3). In order to prevent discoloration, place fruit in a holding solution until it is ready to be packed. Commercial ascorbic acid solutions should be prepared according to manufacturer’s directions. Alternatively, one teaspoon of ascorbic acid (Vitamin C) can be added to a gallon of water. If Vitamin C is in tablet form, crush it thoroughly before adding it to the water and dissolve completely.
Canning Liquids for Fruits
Fruit can be packed in water, sugar syrup, or juice. Commercial unsweetened juices such as apple, pineapple, or grape can be used as is or may be diluted with water.
Juice can also be extracted from the fruit being processed. Simply crush ripe fruit, heat to simmering over low heat and strain through cheesecloth. This extracted juice can be used as is or may be diluted with water.
If sugar syrup is desired for packing, boil sugar and water together in a pan until sugar is dissolved, about five minutes. Combine sugar and liquid according to desired syrup consistency, as shown in table 1.
| Syrup thickness | Sugar (%) | Sugar (cups/quart of liquid) | Yield of syrup (cups) |
|---|---|---|---|
| Very light | 10 | ½ | 4½ |
| Light | 20 | 1 | 4¾ |
| Medium | 30 | 1¾ | 5 |
| Heavy | 40 | 2¾ | 5 1/3 |
| Very heavy | 50 | 4 | 6 |
The Canning Process
Packing
Foods may be packed into jars when raw or hot. “Raw packing” means adding raw fruit directly to the jar and then pouring boiling water or syrup over the product. Raw product is packed tightly for most products because there is shrinkage that occurs after the product cools.
“Hot packing” involves heating the food to boiling or cooking it for a specified amount of time, then packing it into jars along with the boiling hot liquid. Hot packing is always done loosely because the product shrinks during the cooking process. Hot packing yields better color and flavor compared to raw packing.
Preheating the Boiling Water Bath
Fill the boiling water bath canner half full with clean, hot water. Center the canner over the burner and pre-heat water to 140 F for raw-packed foods and 180 F for hot-packed foods. Place an extra kettle of water on the stove burner should additional boiling water be needed to cover the jars in the canner.
Preparing Jars and Lids
Discard canning jars with nicks or cracks; damage may prevent an airtight seal from forming. Wash jars in the dishwasher or using soapy water, followed by a rinse in hot water. Keep the jars hot until you use them. This will prevent breakage once jars are filled and placed into the canner.
Jars that will be filled with food and boiled in hot water for fewer than 10 minutes need to be sterilized. This can be done by boiling them for 10 minutes prior to filling. Each 1,000 feet above sea level will require one additional minute of boiling. Use a new canning lid for each jar. Prior to use, examine all lids for dents, gaps, or defects in the sealing gasket. Prepare lids according to manufacturer’s directions. Most need to be brought to a simmer and then left in hot water until use (figure 4).
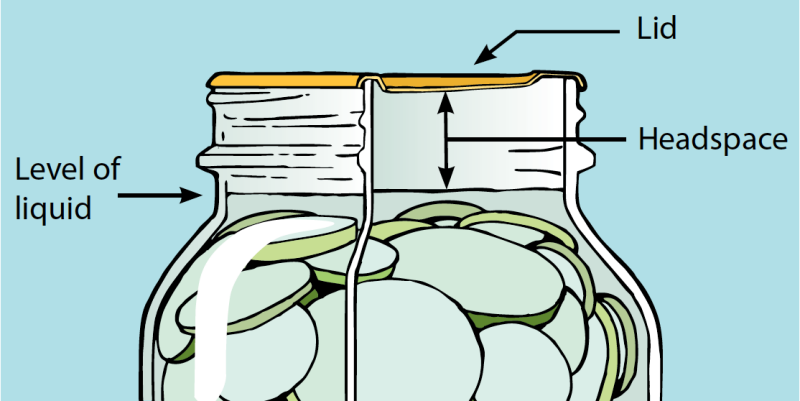
Headspace
Regardless of the type of packing process that is used, all products require that a specific amount of headspace be left after filling (figure 5). Headspace is the distance between the top of the jar and the top of the food. Foods that swell require more headspace when filling. If too little headspace is left, food may boil up and out of the jar, preventing a seal. If too much headspace is left, the processing time may be inadequate to drive off the oxygen within the jar, preventing the seal from forming. Recipes will specify the amount of headspace that should be left for each specific product.
Closing the Jars
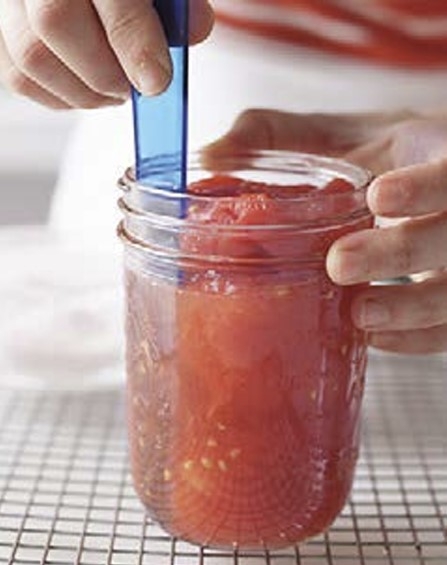
Excessive air bubbles that remain in the product will rise during boiling. This may affect the amount of air space within the jar during processing. Remove air bubbles using a plastic spatula or utensil (figure 6). Do not use metal because it may scratch the glass, which could weaken the jar and cause breakage during processing. Gently poke the spatula into the jar, allowing air to escape throughout the product.
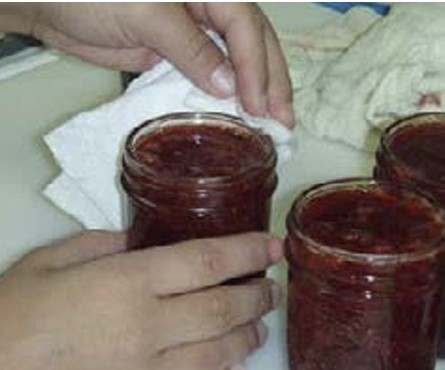
Wipe the rim of the jar with a clean, damp cloth, removing all debris and liquid (figure 7). Center the metal lid with sealing compound onto the jar and lightly screw the metal band into place. Do not overscrew or air will not be able to escape during the canning process. This can result in buckled lids and cans that do not seal.
Selecting the Correct Processing Time
Food is heated to 212 F (100 C) and processed for the amount of time that is required to destroy all dangerous microorganisms. Processing times will depend on a number of factors, such as the density of the food product, packing liquid, pH, and jar size.
Processing times and recipes should be obtained from approved sources, such as the National Center for Home Food Preservation (NCHFP), the “So Easy to Preserve” bulletin from the University of Georgia Cooperative Extension (White et al. 2006), or the “USDA Complete Guide to Home Canning” (2009). These sources provide scientifically developed processing times designed for specific food products and should be followed exactly as stated. Examples of these products and their processing times are listed in table 2. If a processing time is not available for your product or recipe, do not attempt to preserve it by the boiling water bath canning method.
| Product | Style of pack | Jar size | Boiling water, 212 F, 100 C (minutes) | Pressure canner, 5 PSIa (minutes) |
|---|---|---|---|---|
| Apples, sliced | Hot | Pint | 20 | 8 |
| Apples, sliced |
Hot | Quart | 20 | 8 |
| Applesauce | Hot | Pint | 15 | 8 |
| Applesauce | Hot |
Quart | 20 | 10 |
| Berries | Hot | Pint | 15 | 8 |
| Berries | Hot | Quart | 15 | 8 |
| Berries | Raw | Pint | 15 | 8 |
| Berries | Raw |
Quart | 20 | 10 |
| Cherries | Hot | Pint | 15 | 8 |
| Cherries | Hot | Quart | 20 | 10 |
| Cherries | Raw | Pint | 25 | 10 |
| Cherries | Raw | Quart | 25 | 10 |
| Fruit juices | Hot | Pint | 5 | NRb |
| Fruit juices |
Hot | Quart | 5 | NR |
| Fruit juices |
Hot | Half-gallon | 10 | NR |
| Peaches | Hot | Pint | 20 | 10 |
| Peaches | Hot | Quart | 25 | 10 |
| Peaches | Raw | Pint | 25 | 10 |
| Peaches | Raw | Quart | 30 | 10 |
| Pears | Hot | Pint | 20 | 10 |
| Pears | Hot | Quart | 25 | 10 |
| Plums | Hot and raw | Pint | 20 | 10 |
| Plums | Hot and raw |
Quart | 25 | 10 |
a PSI = Pressure in pounds per square inch measured by a weighted gauge pressure canner.
b Not recommended for fruit juice.
Processing times provided in canning tables are for altitudes less than 1,000 feet above sea level. If you are canning at an altitude above 1,000 feet, follow the altitude adjustments provided in table 3.
| Altitude (feet) | Increased processing time (minutes) |
|---|---|
| 1,001-3,000 | 5 |
| 3,001-6,000 | 10 |
| 6,001-8,000 | 15 |
| 8,001-10,000 | 20 |
General Boiling Water Bath Processing Steps
Once the jars are properly packed and closed, and the processing time has been correctly selected, process as follows:
- Allow water in canner to reach a rolling boil. Maintain a separate pot of boiling water should additional water be needed to cover jars during processing.
- Place jars in canning rack, spaced far enough apart so that water can easily circulate around each jar, then place rack in boiling water. Cover with a tight-fitting lid.
- Begin timing for processing as soon as the water returns to a rolling boil. Maintain the water level 1 to 2 inches over the tops of the jars when boiling.
- Use table 2 as a processing guide; however, at higher altitudes (more than 1,000 feet) you will need to adjust processing times (table 3).
- After the processing time is completed, remove hot jars and place then on a towel or rack to cool. Keep jars out of drafts. Do not turn jars upside down.
- Once the jars have cooled — 12-24 hours after processing — check the seal of each jar.
- If a jar is not sealed, refrigerate and reprocess within 24 hours or refrigerate and consume within three days.
Testing the Seal
Test the seal of jars within 12 to 24 hours of processing, when jars are completely cool, by pressing the center of the lid or tapping the lid with a spoon (figure 8). The lid should stay down and give a clean ringing sound when tapped. If it makes a dull sound, the lid is not sealed. If a jar is not sealed, refrigerate and reprocess within 24 hours or refrigerate and consume within three days.

Reprocessing
Foods from jars that did not seal should be reprocessed within 24 hours. Check the jar and lid for nicks. Repack food into a new container if needed, using new lids and process using the same method. Label as being “reprocessed” and consume first.
Labeling and Storage
Remove screwbands from sealed jars to prevent them from rusting. Wash food residue from the jars. Label jars or cans with the date, contents, and lot number if more than one batch was processed on a single day. This provides trace-back information if one jar or can spoils
Canned products should be stored in a cool, dry area between 50 F and 70 F for up to one year. After one year, home-canned products may still be consumed; however, overall quality and nutritional value may have diminished. Discard badly dented, swollen, and/ or rusty cans.
Handling Spoiled Canned Food
Look closely at all jars of food before opening them. Bulging lids or leaking jars are signs of spoilage. When you open the jar, look for spurting liquid, mold, or an unusual odor. Do not taste foods that show signs of spoilage. The growth of mold can increase the pH, turning a high-acid food into a low-acid food capable of supporting the growth of C. botulinum or other spoilage organisms. In addition, the USDA no longer recommends scraping mold off of the top of jellies and jam products. Molds produce mycotoxins, chemical substances known to be carcinogenic to animals.
Troubleshooting
Possible causes of a jar that won’t seal include overfilling, chipped jar rims, particles of food on the jar rims coming between the surface of the rim and the sealing compound in the lid, lids being too hot or too cold, scratches across the sealing compound in the lid, screw bands being tightened after jars are removed from the canner, thus breaking the seals, and bent or rusty screw bands not holding the lid against the jar rim tightly enough during processing. Spoilage occurs as a result of improper processing times and temperature.
Unsafe Canning Methods
“Open-kettle” canning and the processing of freshly filled jars in conventional ovens, microwave ovens, and dishwashers are not recommended because these practices do not prevent all risks of spoilage.
“Canning powders” are useless as preservatives and do not replace the need for proper heat processing. Jars with wire bails and glass caps make attractive antiques or storage containers for dry food ingredients but are not recommended for use in canning. One-piece, zinc, porcelain-lined caps are also no longer recommended. Both glass and zinc caps use flat rubber rings for sealing jars but too often fail to seal properly.
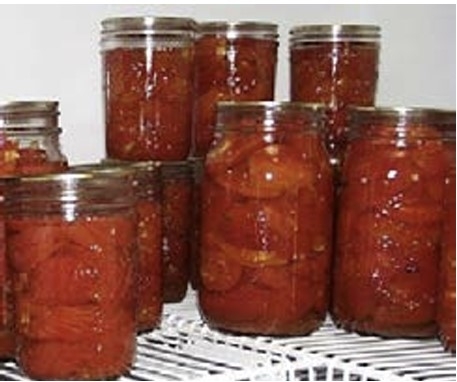
Tomatoes and Tomato Products
Tomatoes are near the dividing line for classification as a high-acid or low-acid food. Most varieties — grown under normal conditions and harvested at optimum ripeness —can be treated as a high-acid food. However, a number of factors can change the acidity, including weather extremes (moisture and heat), condition of the vines (killed by disease or frost), and ripeness. Tomato variety can also affect the acidity. For example, many popular heirloom tomatoes have a lower acidity than newer cultivars (figure 9).
The home food preserver cannot determine the pH of a batch of tomatoes by visual inspection, so it is recommended that either lemon juice or citric acid be added directly to each jar of tomatoes processed in a water bath canner. Tomatoes can be acidified by adding 1 tablespoon of bottled lemon juice or ¼ teaspoon of citric acid per pint. Add sugar to offset acid taste, if desired. Four tablespoons of vinegar per quart or two tablespoons per pint can also be used but may result in undesirable flavor changes.
Some tomato-based products such as salsa and meat spaghetti sauce cannot be processed in a boiling water bath canner because so many low-acid ingredients have been added to them. Such products can only safely be processed using a pressure canner.
Recipe: Whole or Halved Tomatoes, Packed In Water
Wash tomatoes. Dip in boiling water for 30-60 seconds or until skins split, then dip in cold water. Slip off skins and remove cores. Leave whole or halve. Add bottled lemon juice or citric acid to the jars. Add 1 teaspoon of salt per quart to the jars, if desired.
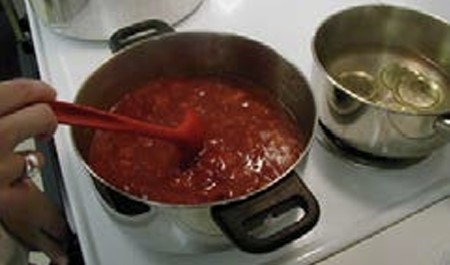
Raw Pack
Heat tomato juice in a saucepan. Fill jars with raw tomatoes, leaving ½-inch headspace. Cover tomatoes in the jars with hot tomato juice, leaving ½-inch headspace. Adjust jar lids and process.
Hot Pack
Put tomatoes in a large saucepan and add enough tomato juice to completely cover. Boil tomatoes and juice gently for 5 minutes. Fill jars with hot tomatoes, leaving ½-inch headspace. Add hot tomato juice to the jars to cover the tomatoes, leaving ½-inch headspace. Adjust jar lids and process.
| Product | Style of Pack | Jar Size | Water bath canner (minutes) 212 F (100 C) |
Pressure Cannera (minutes) 5 PSIb |
Pressure Cannera (minutes) 10 PSI |
Pressure Cannera (minutes) 15 PSI |
|---|---|---|---|---|---|---|
| Tomato juice | Hot | Pint | 35 | 20 | 15 | 10 |
| Tomato juice | Hot | Quart | 40 | 20 | 15 | 10 |
| Tomato/ vegetable Juice blend |
Hot | Pint | 35 | 20 | 15 | 10 |
| Tomato/ vegetable Juice blend |
Hot | Quart | 40 | 20 | 15 | 10 |
| Tomatoes, crushed | Hot | Pint | 35 | 20 | 15 | 10 |
| Tomatoes, crushed | Hot | Quart | 45 | 20 | 15 | 10 |
| Tomato sauce | Hot | Pint | 35 | 20 | 15 | 10 |
| Tomato sauce | Hot | Quart | 40 | 20 | 15 | 10 |
| Tomatoes, water | Hot and raw | Pint | 40 | 15 | 10 | 1 |
| Tomatoes, water | Hot and raw | Quart | 45 | 15 | 10 | 1 |
| Tomatoes, juice | Hot and raw | Pint | 85 | 40 | 25 | 15 |
| Tomatoes, juice | Hot and raw | Quart | 85 | 40 | 25 | 15 |
| Meatless spaghetti sauce | Hot | Pint | NRc | NR | 20 | NR |
| Meatless spaghetti sauce | Hot | Quart | NR | NR | 25 | NR |
| Meat spaghetti sauce | Hot | Pint | NR | NR | 60 | NR |
| Meat spaghetti sauce | Hot | Quart | NR | NR | 70 | NR |
a The USDA recommends processing foods using 5 or 10 pounds of pressure in a weighted gauge pressure canner and 6 or 11 pounds of pressure using a dial gauge. For information concerning the safe pressure canning of fruits and vegetables, see “Pressure Canning,” Virginia Cooperative Extension publication 348-585.
b PSI = pressure in pounds per square inch measured by a gauge.
c NR = not recommended because processing at this pressure will affect the quality of the product.
Troubleshooting
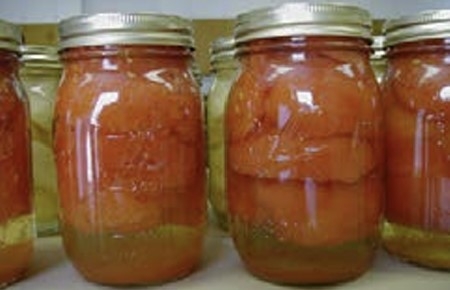
Tomatoes contain a lot of water. If not packed tightly during the packing process, the water boils out and the remaining material floats to the top of the jar, giving a separated appearance (figure 10). This is not a safety issue, so these products can be consumed as long as they seal properly.
Jellied Products
Jams, jellies, conserves, and marmalades are fruit products that are preserved by the formation of a gel matrix through the association of pectin, acid, and sugar. These substances are found naturally in fruit; however, the amount of pectin, acid, and sugar varies with the type and ripeness of a particular fruit. The ratio of these three components must be just right for a gel to form.
Pectin molecules have a negative charge that makes them move away from each other. The acid within a fruit product changes the charge of the pectin to a more neutral charge, allowing the molecules to move closer together. At this point, pectin molecules are still too far apart and moving around too freely to form a stable gel because of unbound water. Sugar is added to bind water. This brings the pectin molecules closer together for the formation of a gel matrix.
Some fruits contain enough pectin and acid to make a good gel with the addition of sugar only. Other fruits have enough pectin but not enough acid. Some have enough acid but lack pectin, while a few fruits lack both acid and pectin (table 5). Fruits have less pectin and acid when fully ripe, so it is recommended that some underripe fruit be used when extracting juice for jelly.
| Adequate pectin and acid | Low pectin or low acid | Low pectin and acid |
|---|---|---|
| Apples, sour | Apples, ripe | Apricots |
| Blackberries, sour | Blackberries, ripe | Blueberries |
| Crabapples | Cherries, sour | Figs |
| Cranberries | Chokeberries | Grapes (western concord) |
| Currants | Elderberries | Guavas |
| Grapes (eastern concord) | Grapefruit | Peaches |
| Lemons | Grape juice, bottled (eastern concord) | Pears |
| Limes | Grapes (Cailifornia) | Plums (Italian) |
| Loganberries | Loquats | Raspberries |
| Quinces | Oranges | Strawberries |
| Plums (not Italian) |
(Adapted from White et al., 2006)
All jellied products are made by cooking fruit or fruit juice with sugar. Pectin and acid will also be added in varying amounts, depending on the type of fruit and the type of product being made.
Jellies are made using fruit juice, which is free of pulp or sediment. Jelly is firm, holds its shape when cut (figure 11), and is not too sweet or too tart.
Jams are prepared by using crushed or chopped fruit (figure 12). Jams are less firm than jelly and are often sweeter.
Preserves have a consistency similar to jams, but they are made using whole fruit or uniform pieces of cut fruit.
Conserves are also jam-like products, made with a combination of fruits. They may also contain nuts, raisins, or coconut.
Marmalades are small fruit pieces suspended in a clear jelly. They are most commonly made with citrus fruit or peels.
Ingredients
Sugar
Granulated white sugar is most commonly used in homemade jellied fruit products. Sweeteners such as brown sugar, sorghum, and molasses are not recommended because their flavor overpowers the fruit flavor and their sweetness varies.
Light corn syrup or light, mild honey can be used to replace part, but not all, of the sugar. For the best results, use tested recipes that specify honey or syrup.
Artificial sweeteners cannot be substituted for sugar in regular recipes because the sugar is needed for gel formation. However, with the addition of modified pectin, gelatin, or gums, gel formation will not be a problem.
Many modified pectin products will make a gelled product using one-third less sugar than regular pectin, while other products require the addition of no sugar. Recipes and processing times provided with modified pectin products must be followed carefully. Jellies and jams made without sugar have a short storage life and are better if made in small quantities as needed. Do not cut down on the amount of sugar a recipe calls for unless syrup is the desired end result.
Acid
The acid content varies among fruits and is higher in unripe fruits. When fruits are low in acid, lemon juice or citric acid may be used.
Pectin
Pectin is available commercially in both powdered and liquid forms. Both forms make acceptable products but they cannot be used interchangeably.
Powdered pectin will not dissolve in high sugar concentrations, so it must be added to the fruit before the sugar. Liquid pectin is added after the sugar. Fruit pectin should be stored in a cool, dry place and used in the year purchased for maximum gel strength.
Add Pectin or Not?
Many homemakers prefer the added pectin method because fully ripe fruits can be used and the cooking time is shorter and standardized. Because of the shorter cooking time, the yield is greater and the product tastes more like the fresh fruit. Others prefer the concentrated flavor of jelly cooked for a longer period of time, and less sugar is needed compared to recipes with added pectin.
Processing Jellies
Jellied products can be prepared, processed, and stored as discussed under the general boiling water bath canning information.
Despite the high-acid content of fruit and the large quantities of sugar that are used to make jellied products, mold growth often occurs on the top. Recent recommendations from the USDA say that products that contain mold growth should be discarded. Mycotoxins, which are chemical substances produced by molds during growth, are known to cause cancer in animals. Mold growth can be minimized by using sterilized jars, packaging products in sealed jars, and processing for a few minutes in a boiling water bath. The heat treatment is short — five minutes after the water returns to a full rolling boil. It is sufficient to destroy mold but won’t hurt the consistency of the jellied product.
There are two additional steps that may be necessary while making jellied products: (1) testing for doneness or formation of the gel, and (2) remaking jellied products when a proper gel does not form.
Tests for Doneness
Products made with commercially added pectin have more predictable processing times; therefore, they do not need to be tested for doneness. Products made without added pectin will need to be tested using one of three methods:
Temperature test: Probably the most reliable method is the temperature test. The boiling point of a sugar-water mixture is a reflection of the sugar concentration. Water will boil at approximately 212 F, but add sugar and the temperature at which the mixture boils goes up. A mixture that’s 65 percent sugar will boil at about 220 F. Cook jam or jelly until the temperature reaches 220 F. Use a candy or jelly thermometer to determine when the jelly is done. Use table 6 to adjust for altitudes above sea level.
| Altitude (feet) | When jelly is “done” (degrees Fahrenheit) |
|---|---|
| Sea level | 220 |
| 1,000 | 218 |
| 2,000 | 216 |
| 3,000 | 214 |
| 4,000 | 212 |
Refrigerator test: Remove the jam or jelly mixture from the heat. Pour a small amount of the boiling mixture onto a chilled plate. Put the plate in the freezer for a few minutes. If jelly sets, the mixture has cooked long enough. Jam will not be as firm when done as jelly.
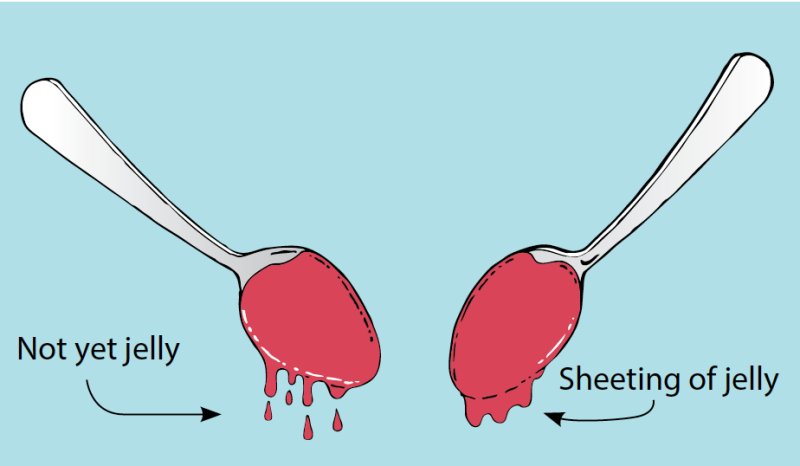
Spoon or sheet test: Dip a cold metal spoon in the boiling jelly mixture. Lift the spoon out so the jelly mixture runs off the side. When the drops run together and fall off the spoon in a sheet, the jelly is done (figure 14).
Remaking Jellies
Remaking jellies is necessary when a proper gel does not form. There are a number of reasons why this might happen, including undercooking, inadequate processing temperatures, or not enough of the essential, gel-forming ingredients (pectin, acid, or sugar). If it’s a small quantity, use it for pancake syrup, an ice cream topping, or as a glaze for meats. If the decision is to remake the batch, review the ingredients and procedures used to see if you can determine why it did not gel. Remaking may not work every time.
To remake with powdered pectin: Work with no more than 4 to 6 cups of jelly at a time. For each 4 cups of jelly, mix ¼ cup sugar, ½ cup water, 2 tablespoons bottled lemon juice, and 4 teaspoons powdered pectin in a saucepan. Bring to a boil while stirring. Add jelly and bring to a rolling boil over high heat, stirring constantly. Boil hard for 30 seconds. Remove from heat, quickly skim foam off jelly, and fill sterile jars, leaving ¼-inch headspace. Adjust new lids and process for 5 minutes in a boiling water bath.
To remake with liquid pectin: Work with no more than 4 to 6 cups of jelly at a time. For each 4 cups of jelly, measure ¾ cup sugar, 2 tablespoons bottled lemon juice, and 2 tablespoons liquid pectin. Put jelly in a saucepan and bring to a boil over high heat while stirring. Remove from heat and add the sugar, lemon juice, and pectin. Return to heat and bring to a full, rolling boil, stirring constantly. Boil hard for 1 minute. Remove from heat, quickly skim off foam, and fill sterile jars, leaving ¼-inch headspace. Adjust new lids and process for 5 minutes in a boiling water bath.
To remake without added pectin: Work with no more than 4 to 6 cups of jelly at a time. For each 4 cups of jelly, add 2 tablespoons bottled lemon juice. Heat to boiling and boil for 3 to 4 minutes. Test for doneness. Remove from heat, quickly skim off foam, and fill sterile jars, leaving ¼-inch headspace. Adjust new lids and process for 5 minutes in a boiling water bath.
Recipe: Peach-Pineapple Spread
Ingredients:
4 cups drained peach pulp
2 cups drained, unsweetened, crushed pineapple
¼ cup bottled lemon juice 2 cups sugar (optional)
Directions:
Thoroughly wash 4 to 6 pounds of firm, ripe peaches. Drain well. Peel and remove pits. Grind fruit flesh with a medium or coarse blade, or crush with a fork (do not use a blender). Place ground or crushed fruit in a 2-quart saucepan. Heat slowly to release juice, stirring constantly until fruit is tender. Place cooked fruit in a jelly bag or strainer lined with four layers of cheesecloth. Allow juice to drip for about 15 minutes. Save the juice for jelly or other uses. Measure 4 cups of drained fruit pulp for making spread. Combine the 4 cups of pulp, pineapple, and lemon juice in a 4-quart saucepan. Add up to 2 cups of sugar, if desired, and mix well. Heat and gently boil half-pints for 15 minutes and pints for 20 minutes, stirring enough to prevent sticking. Fill jars quickly, leaving ¼-inch headspace. Adjust jar lids and process.
Pickled Products
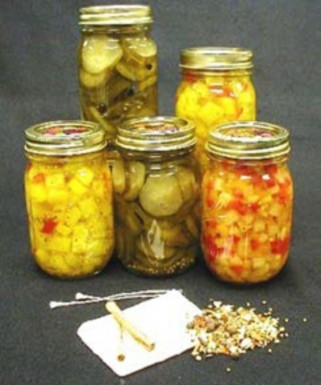
Pickled fruits and vegetables can be safely processed using the boiling water bath canning method because they are high-acid products (figure 15). The addition of vinegar or the formation of acid through the fermentation process decreases pH, preventing the growth of C. botulinum.
There are four types of pickled products:
- Brined pickles, also called fermented pickles, are cured in a brine solution (salt and water) for at least one week. Curing changes the cucumber color from a bright green to an olive or yellow-green. The interior of the cucumber becomes uniformly tender and firm. The salt used in making brined pickles not only provides characteristic flavor but is also vital to the safety of the product.
- Fresh-pack or quick-process pickles are brined for several hours to overnight, then drained and combined with boiling hot vinegar, spices, and other seasonings. They have a tart, pungent flavor. Fresh-pack whole cucumbers are olive green, crisp, tender, and firm. Flavor is enhanced if processed jars are allowed to stand for several weeks after being sealed.
- Fruit pickles are prepared by simmering whole or sliced fruit in a spicy, sweet-sour syrup made with vinegar or lemon juice.
- Relishes are chopped fruits and vegetables that are cooked in a spicy vinegar solution.
Equipment for Fermentation
Stone crocks, glass jars and bowls, and food-grade plastic containers are suitable containers for fermenting fresh vegetables. Nonfood-grade plastic containers may be used if lined with a food-grade plastic bag. Be certain that foods contact only food-grade products. Do not use garbage bags or trash liners. A 1-gallon container will hold 5 pounds of fresh vegetables.
Common Ingredients for Fermented (Brined) Products
Fruits and Vegetables
Correct proportions of fruits or vegetables, sugar, salt, vinegar, and spices are essential for successful pickling. Select tender vegetables and firm fruit that is free from bruises, decay, or mold. Overly mature fruits and vegetables will shrivel during the pickling procedure, so plan to pickle within 24 hours of harvest.
Cucumbers deteriorate quickly at room temperatures, so refrigerate product if pickling does not occur within 24 hours. Select unwaxed cucumbers of a pickling variety for the best results. (Brine will not be able to penetrate a waxy surface.) Sort cucumbers for uniform length. Use 1½-inch lengths for gherkins, 4 inches for dills, and odd-shaped cucumbers for relishes or bread- and-butter-style pickles. Wash thoroughly. Be sure to remove a 1/16-inch slice from the blossom end of vegetables because blossoms contain an enzyme that can cause softening.
Salt
Use pickling or canning salt. Other salts contain anti-caking agents that may cloud the brine. Iodized salt will cause the pickles to be dark in color. Salt is essential to the fermentation process and to the formation of acid, so salt concentrations in fermented pickles or sauerkraut should be followed exactly as stated.
Vinegar
Vinegar is used for preservation of the product and for modifying the taste. Use a cider or white distilled vinegar with 5 percent acidity. Cider vinegar, with its mellow acid taste, gives a nice blending of flavors but may darken white or light-colored fruits and vegetables. White distilled vinegar has a sharp, pungent, acetic acid taste and is desirable when light color is important. The addition of water weakens the preservative effect of the vinegar. If a less-sour product is preferred, add sugar rather than decreasing the vinegar.
Sugar
Use white sugar unless the recipe specifically calls for brown sugar. If you plan to use a sugar substitute, follow recipes developed for these products.
Spices
Use whole, fresh spices for the best flavor. Powdered spices may cause the product to darken and appear cloudy. The best results can be obtained by tying spices in a cloth bag or cheesecloth and removing them before packing in the jars.
Water
Soft water should be used when brining pickles. Hard water will interfere with the formation of acid during the fermentation process. If soft water is not available, purchase distilled water or boil hard water for 15 minutes, let it sit for 24 hours, and remove from container without disturbing sediment.
Firming Agents
Firming agents are not necessary if quality ingredients and up-to-date methods are used. Soaking cucumbers in ice water for four to five hours prior to pickling will produce a crisper product more safely than will the addition of firming agents. Calcium in lime improves pickle firmness. Food-grade lime may be used as a lime-water solution for soaking fresh cucumbers for 12 to 24 hours before pickling them. Excess lime must be removed by draining the lime-water solution, rinsing with fresh water, and resoaking in fresh water for one hour. Repeat the rinsing and soaking two more times. Failure to adequately remove lime — an alkaline substance that increases the pH — may increase the risk of botulism.
Processing
Pickled products can be prepared, processed, and stored as discussed under the general boiling water bath canning information. Heat processing is recommended for all pickle products to destroy organisms that cause spoilage and to inactivate enzymes that may affect flavor, color, and texture.
Recipe: Dill Pickles
Ingredients per gallon capacity of your container:
4 pounds 4-inch pickling cucumbers
2 tablespoons dill seed or 4-5 heads fresh or dry dill weed
½ cup salt
¼ cup vinegar 8 cups water
Optional: One or more of the following ingredients: 2 cloves garlic, 2 dried red peppers, 2 teaspoons whole, mixed pickling spices
Directions:
Wash cucumbers. Cut a 1/16-inch slice off the blossom end and discard. Leave ¼ inch of stem attached.
Place half of dill and spices on the bottom of a clean, suitable container. Add cucumbers, remaining dill, and spices.
Dissolve salt in vinegar and water and pour over cucumbers. Add suitable cover and weight.
Store where temperature is between 70 F and 75 F for about 3 to 4 weeks while fermenting. Temperatures of 55 F to 75 F are acceptable, but the fermentation will take 5 to 6 weeks. Avoid temperatures above 80 F or pickles will become too soft during fermentation.
Fermenting pickles cure slowly. Check the container several times a week and promptly remove surface scum or mold.
Caution: If the pickles become soft, slimy, or develop a disagreeable odor, discard them. Fully fermented pickles may be stored in the original container for about 4 to 6 months provided they are refrigerated and surface scum and molds are removed regularly.
Canning fully fermented pickles is a better way to store them. To can them:
Pour the brine into a pan, heat slowly to a boil, and simmer 5 minutes.
Filter brine through paper coffee filters to reduce cloudiness, if desired.
Fill jar with pickles and hot brine, leaving ½-inch headspace. Adjust jar lids and process 10 minutes for pints and 15 minutes for quarts.
References
National Center for Home Food Preservation (NCHFP). www.uga.edu/nchfp/index.html.
USDA. 2009. USDA Complete Guide to Home Canning. U.S. Department of Agriculture National Institute of Food and Agriculture. Agriculture Information Bulletin No. 539.
www.uga.edu/nchfp/publications/publications_usda.html.
White, A., A. Ford, E. L. Andress, and J. A. Harrison. 2006. So Easy to Preserve. 5th ed. Athens: University of Georgia Cooperative Extension Service.
Virginia Cooperative Extension materials are available for public use, reprint, or citation without further permission, provided the use includes credit to the author and to Virginia Cooperative Extension, Virginia Tech, and Virginia State University.
Virginia Cooperative Extension is a partnership of Virginia Tech, Virginia State University, the U.S. Department of Agriculture (USDA), and local governments, and is an equal opportunity employer. For the full non-discrimination statement, please visit ext.vt.edu/accessibility.
Publication Date
May 6, 2022